Final Cut Pro is one of the most popular video editing software among thousands of seasoned as well as hobbyist video editors. Widely appreciated for its straightforward and intuitive UI, FCP makes professional video editing easier and more approachable even for complete newbies. However, in the beginning, they may still come across certain challenges. For example, I remember struggling to drag clips to the Magnetic Timeline, when I used it for the first time. And that’s just one instance (there are many others).
Good thing- I gave the time and effort into learning this tool and then editing hundreds of video projects inside it, which helped me compile this sweet guide for y’all. By the end of this article, you will have a good idea about how you can create, edit, combine, trim, color grade, and beautify your video projects in FCP. Plus, I’ll be discussing the key features that make this tool your go-to video editor. So, let’s start.
Final Cut Pro App Interface
When you launch Final Cut Pro Windows or Mac, you will see an interface like this:
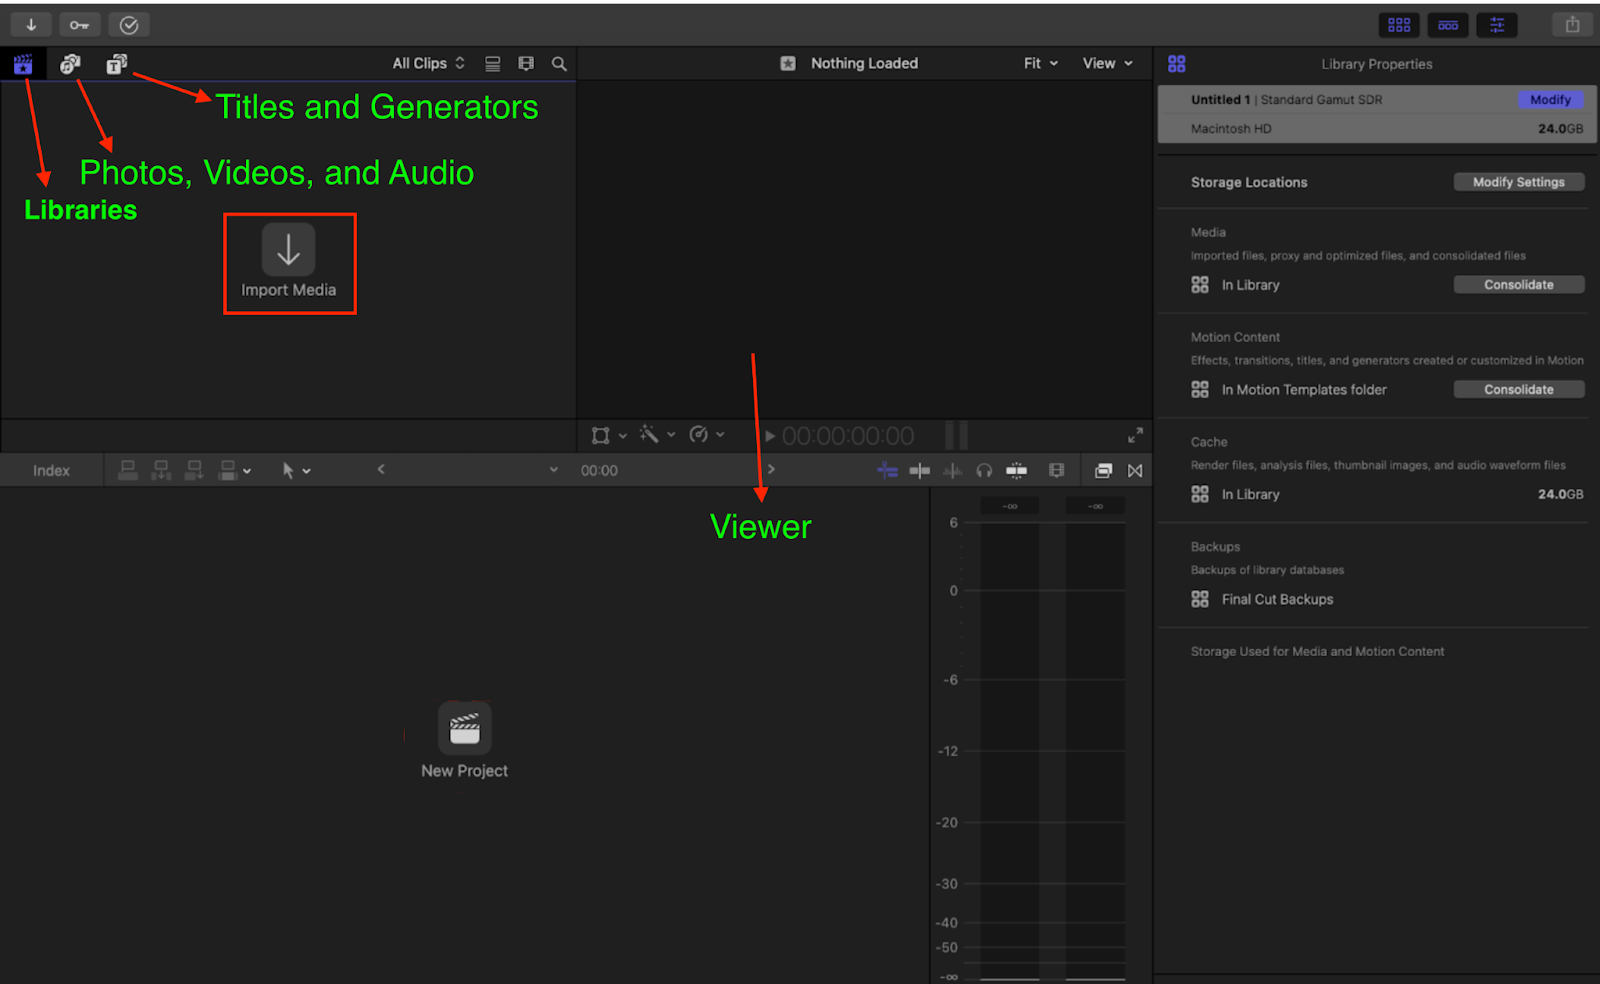
In this interface, you will find these options-
Viewer
The viewer is a screen where you can see your edited video.
Libraries, Events, and Projects
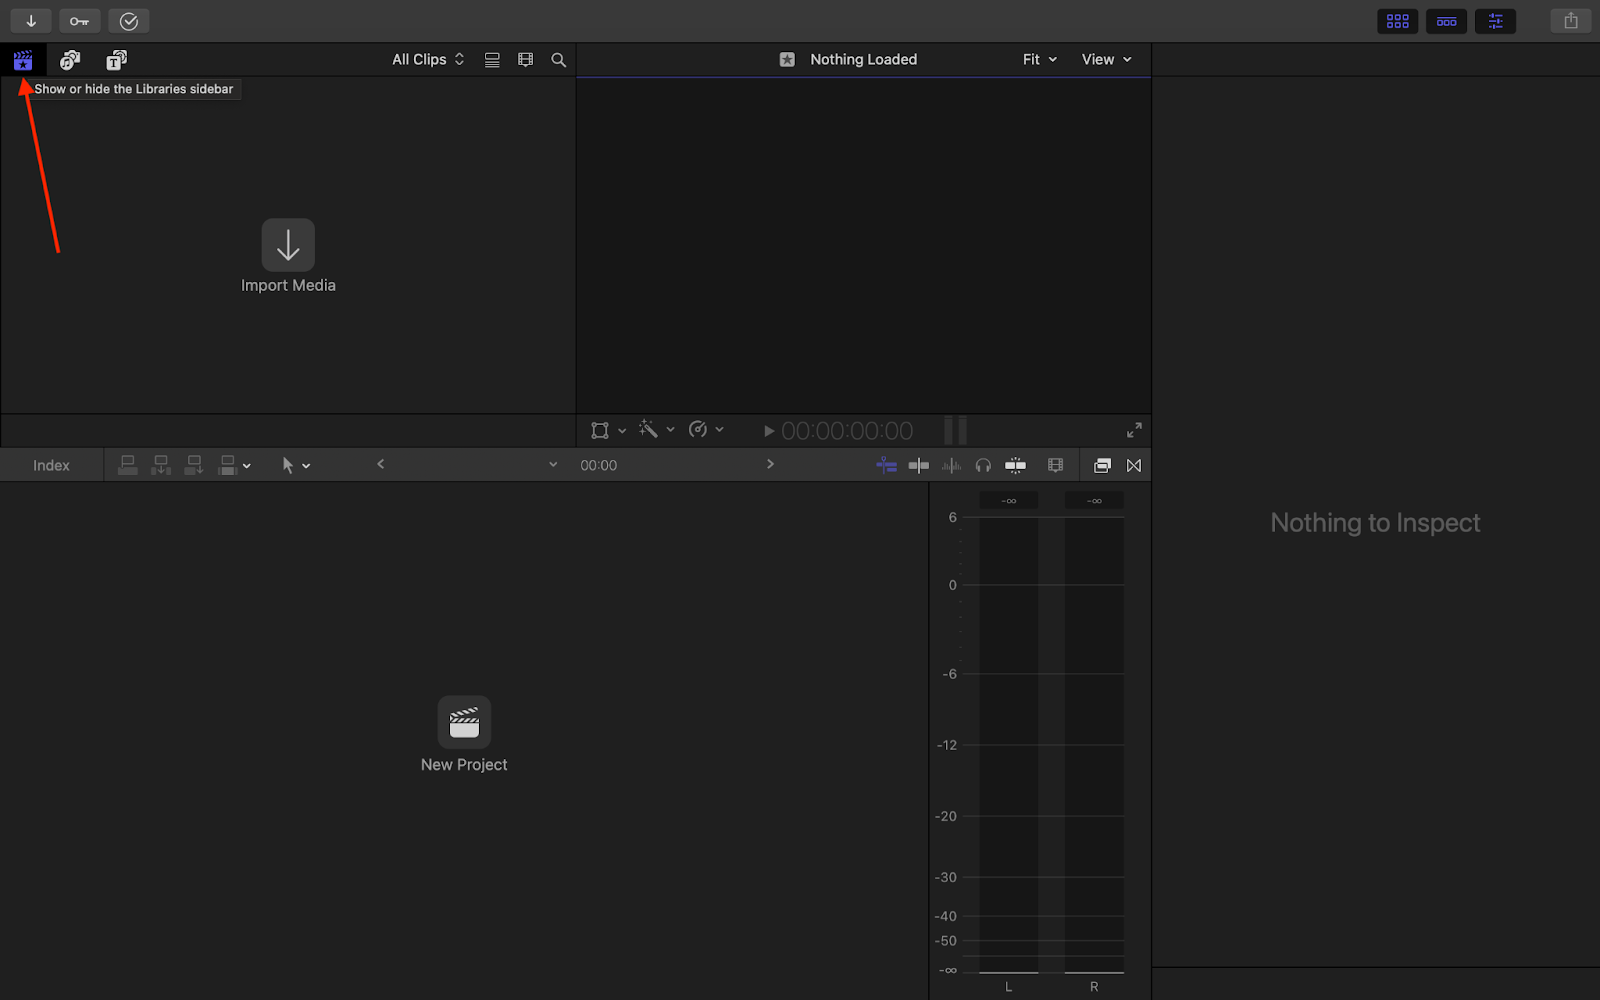
The Library in FCP is the place where all your media/data is stored.
You can open the Library by clicking on the highlighted icon in the screenshot below and hide by clicking again.

In the Library, users can create multiple Events, and then multiple Projects inside these Events. To understand the concepts of Libraries, Events, and Projects, we can think of real Libraries, in which multiple books are placed on different bookshelves. In this case, the bookshelves refer to our Events and the books are our projects.
Technically, Events are folders where you can categorize your Projects for ease of management, while a Project is an entity in which the editing goes on from start to end.
How to create a new Library?
To create a new Library, go to: File> New> Library.
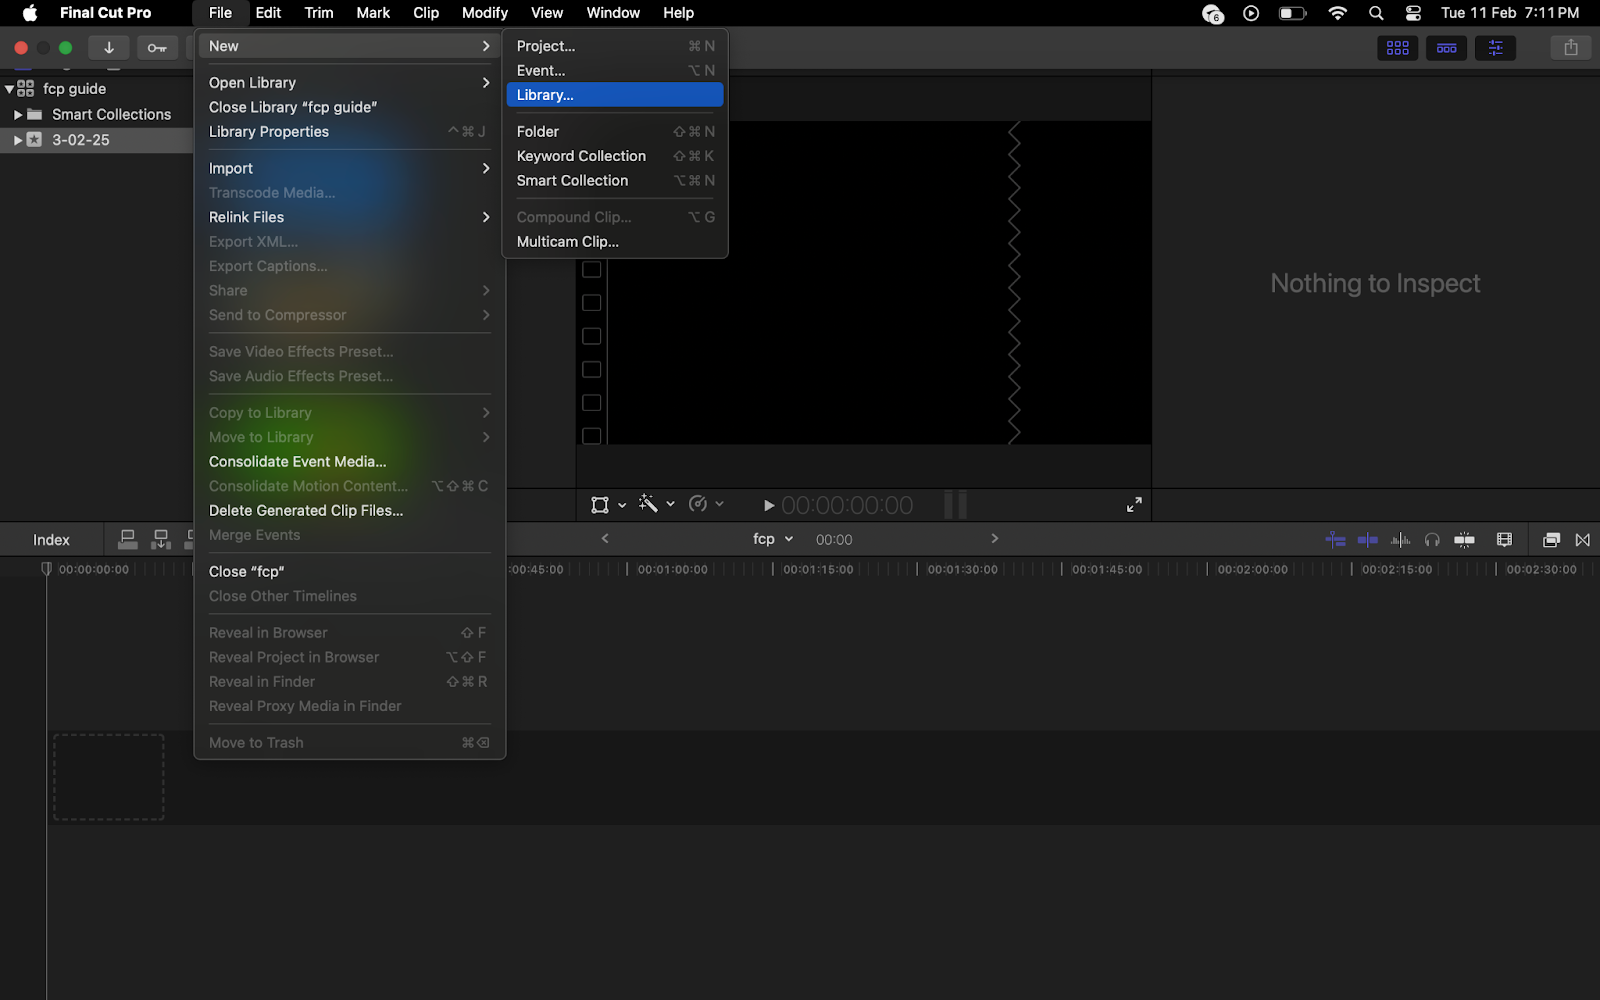
After you click on New, this Window will open up-
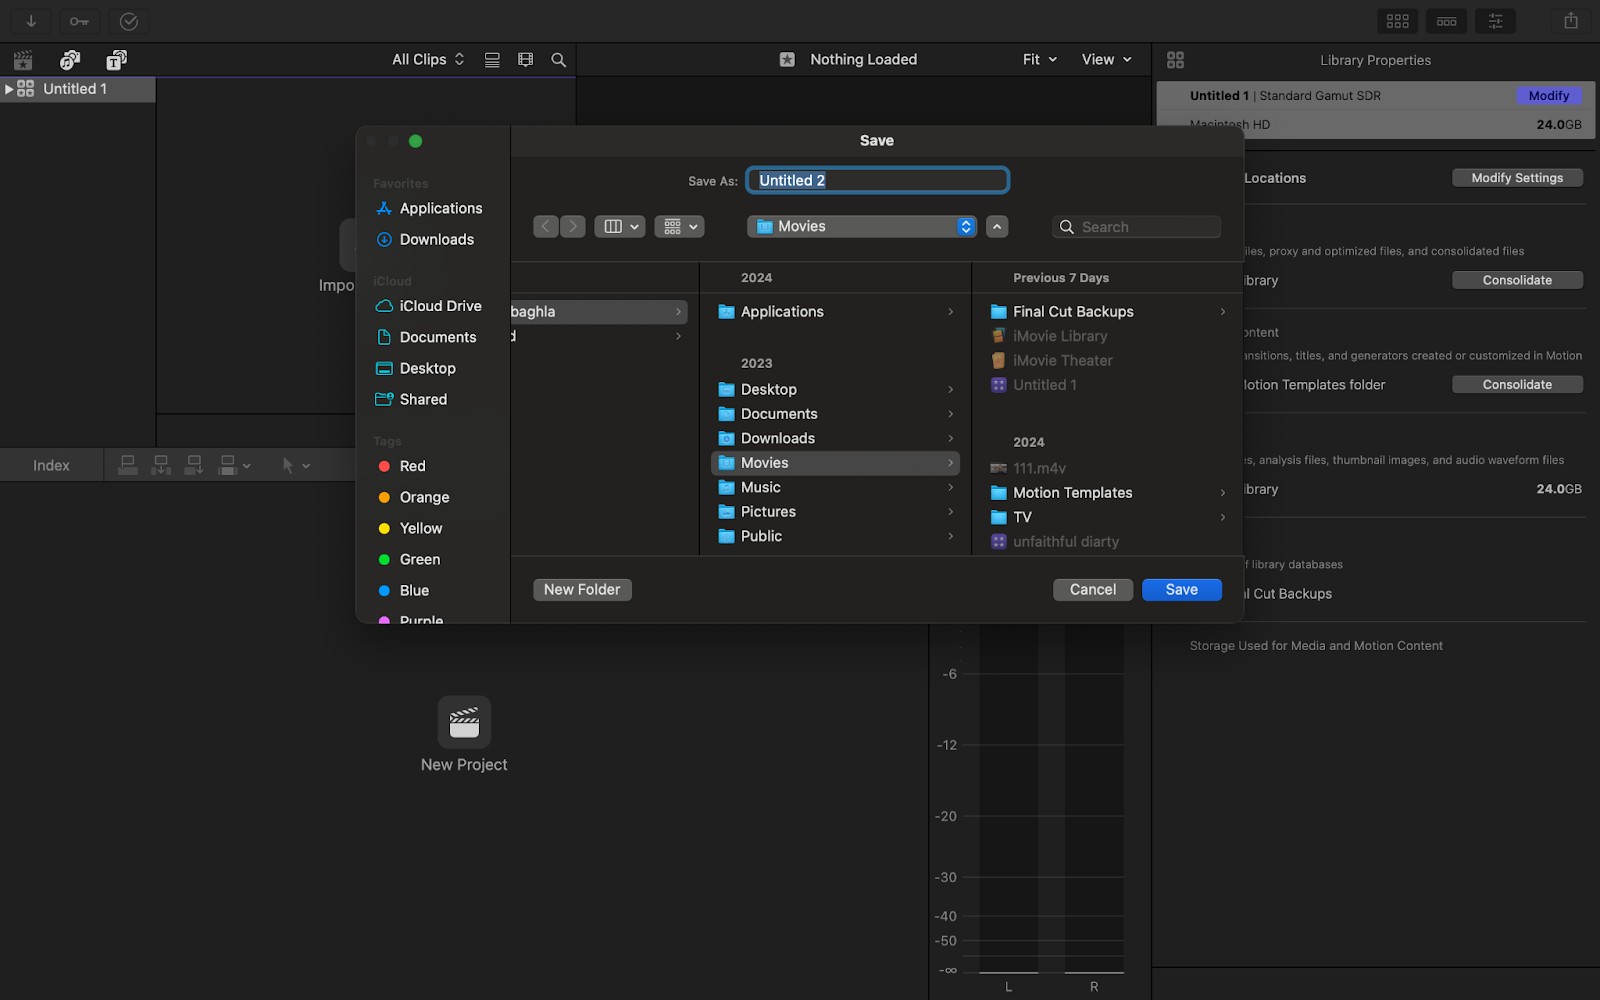
Now, choose a location for your Library, give it a name, and save it.
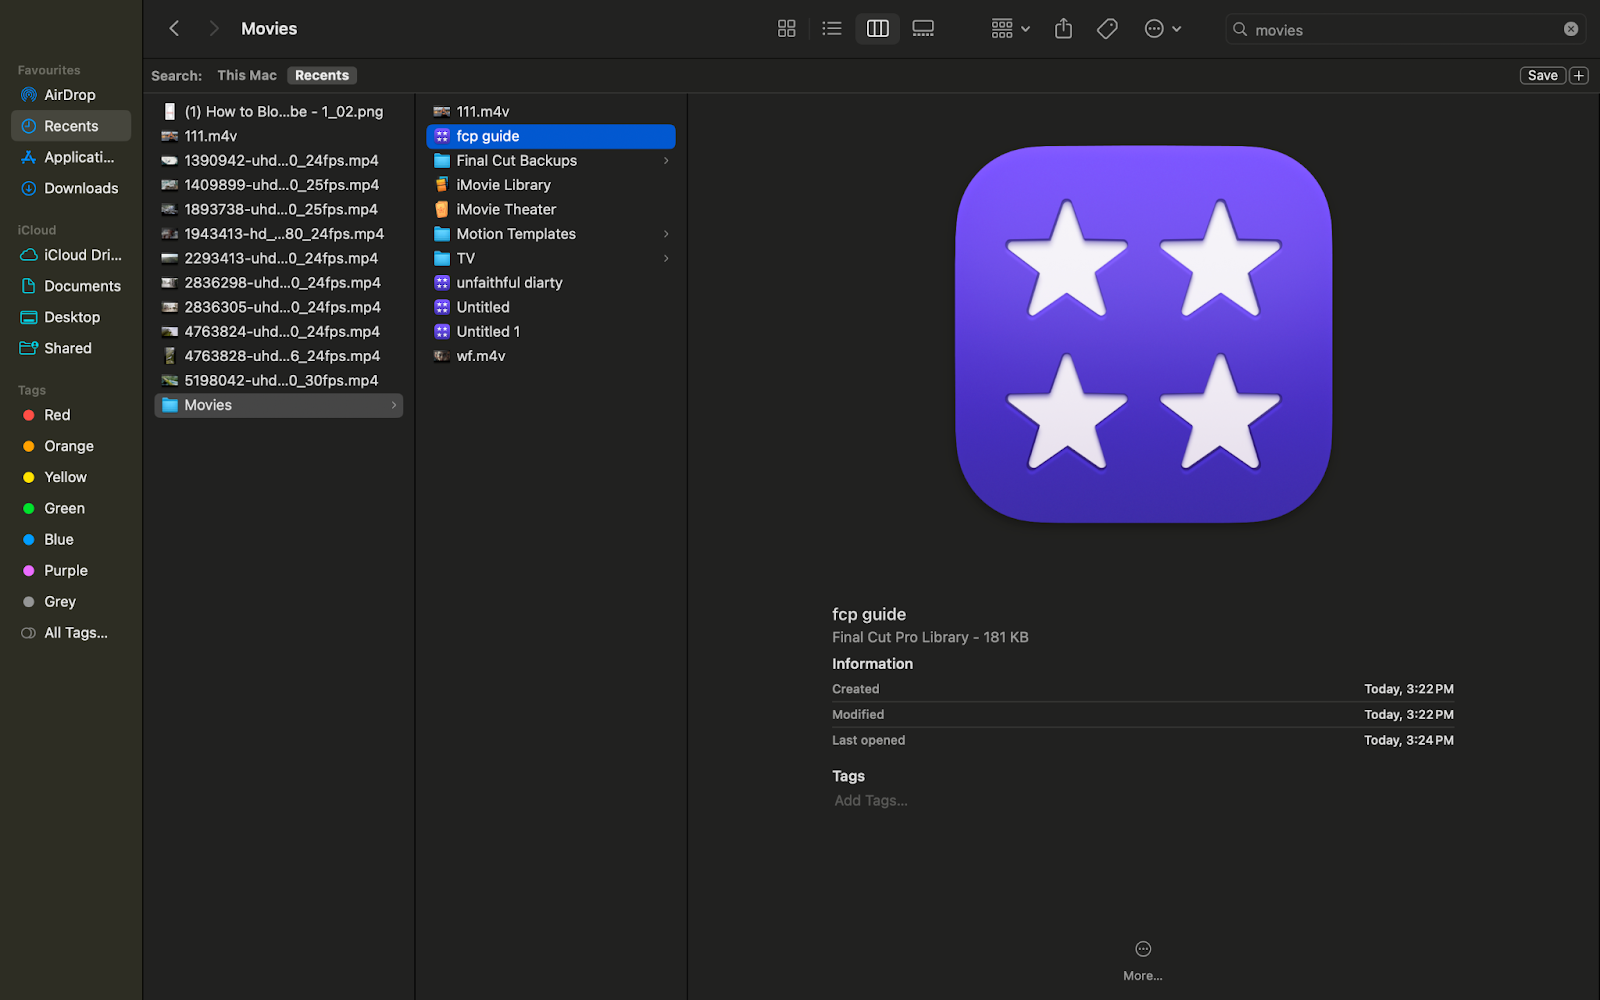
Now, you can find this Library in the folder you saved it.
How to create new events in a Library?
To create a new event in the Library just click on the Library or existing event in that Library in which you want to add that event or you can also use the shortcut “Option + N” to make a new event in a particular Library or can follow the path File> New> Event.

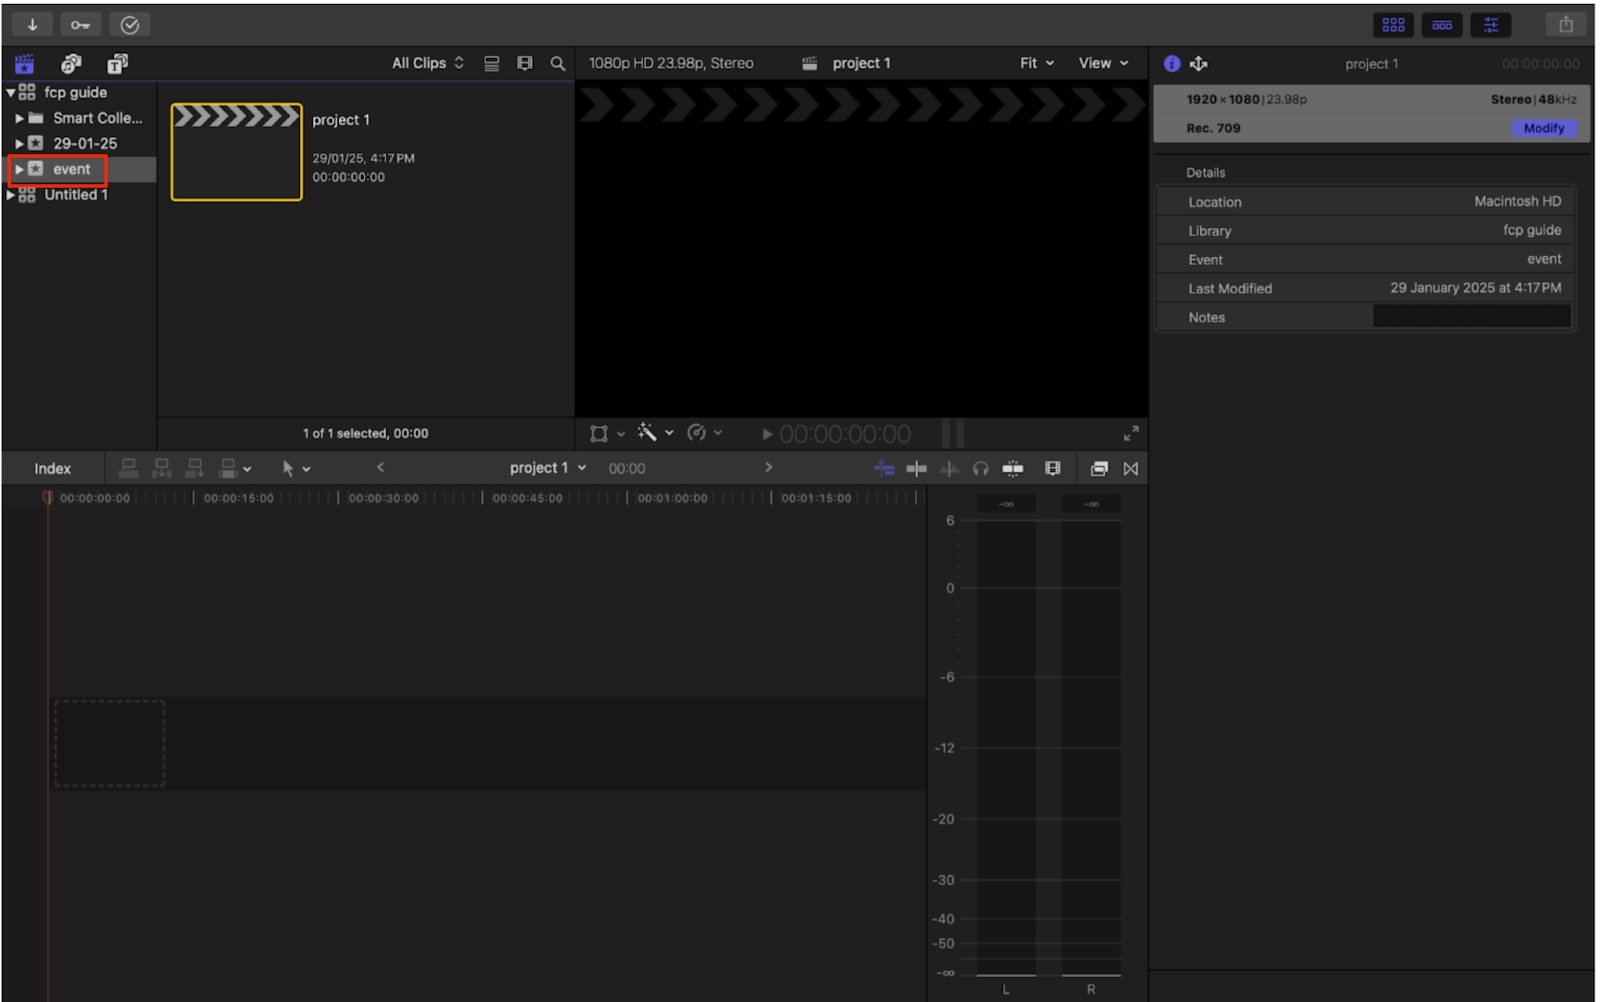
How to create new projects in an event?
To create a new project in a particular event, just click on that event present at the left sidebar within a library and click on “New Project” or can use the shortcut “command + N” or simply follow the path File> New> Project. You can see projects in events like this-

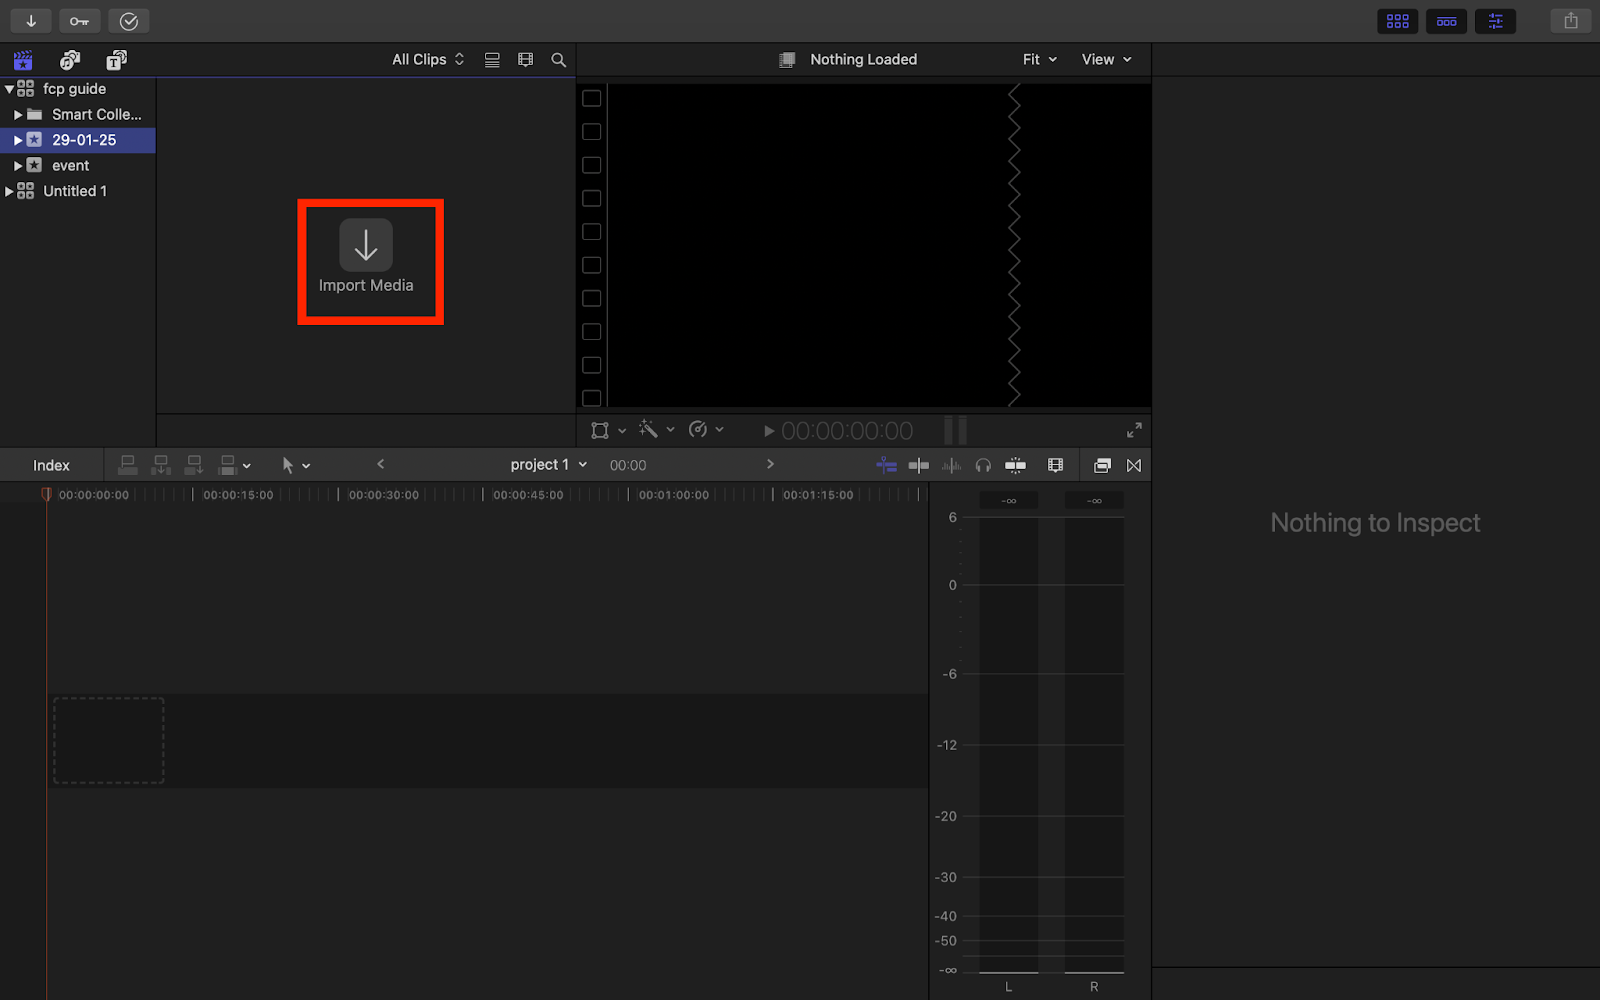
Import Media
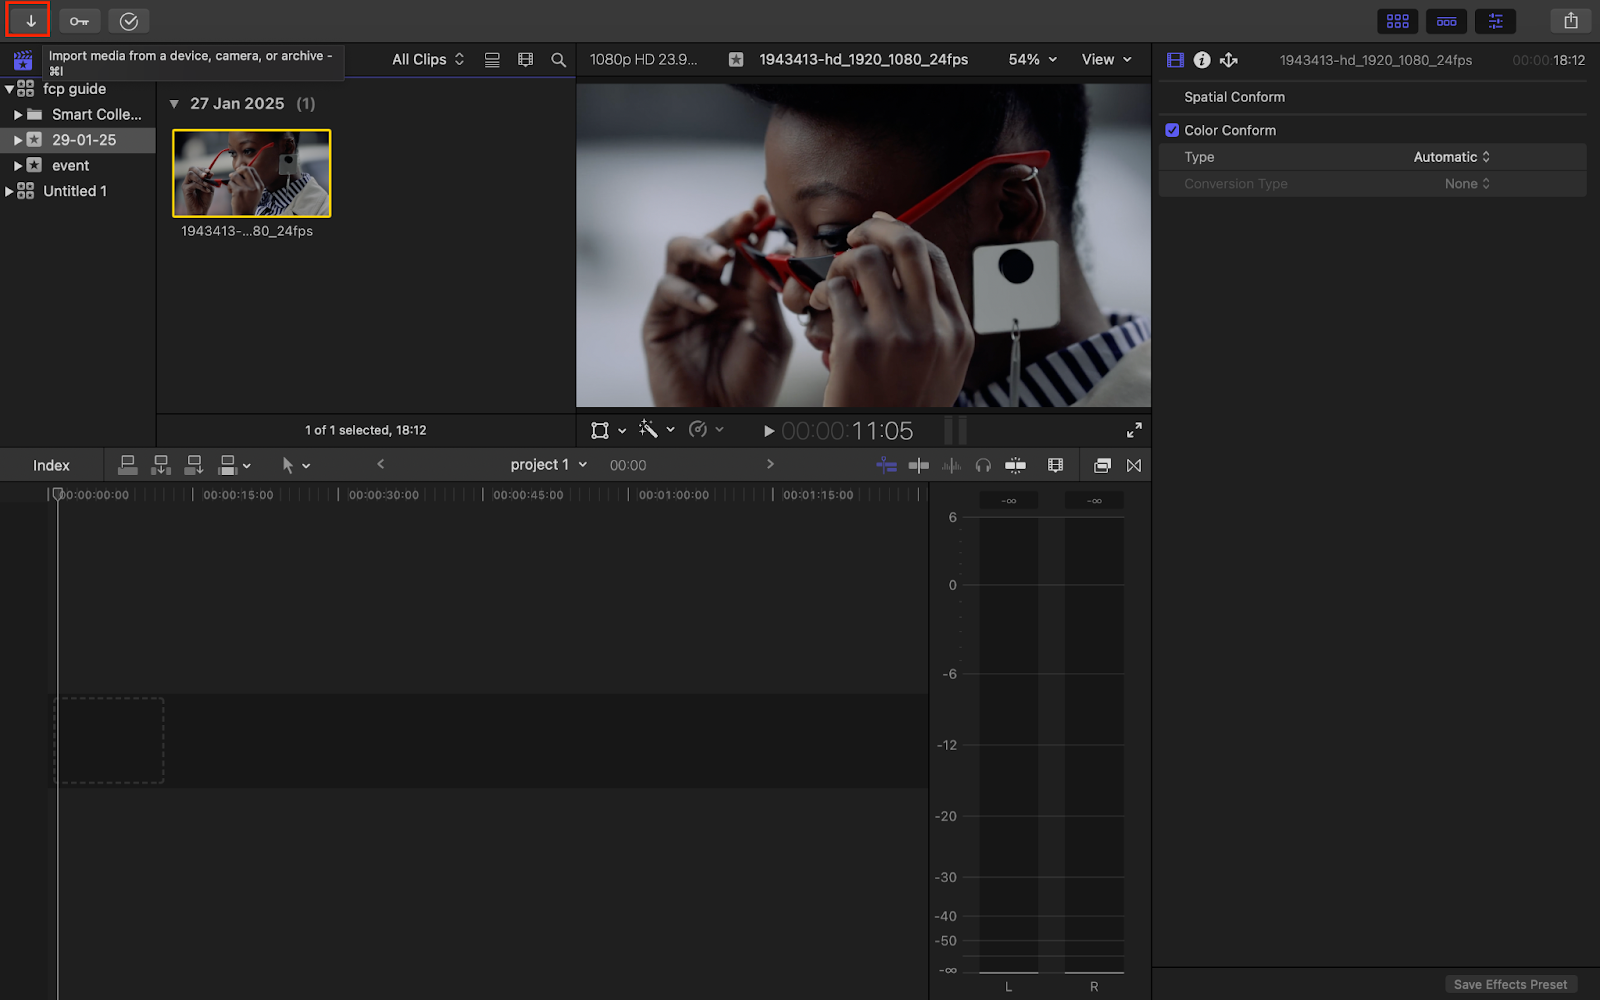
To import media, you can go to the “Import Media” option in an empty Event or click the “Down Arrow” on the top left corner, while in a Project.
After clicking on “Import Media,” a new Window will pop-up, where you can pick the files you wish to import into your Event or Project.
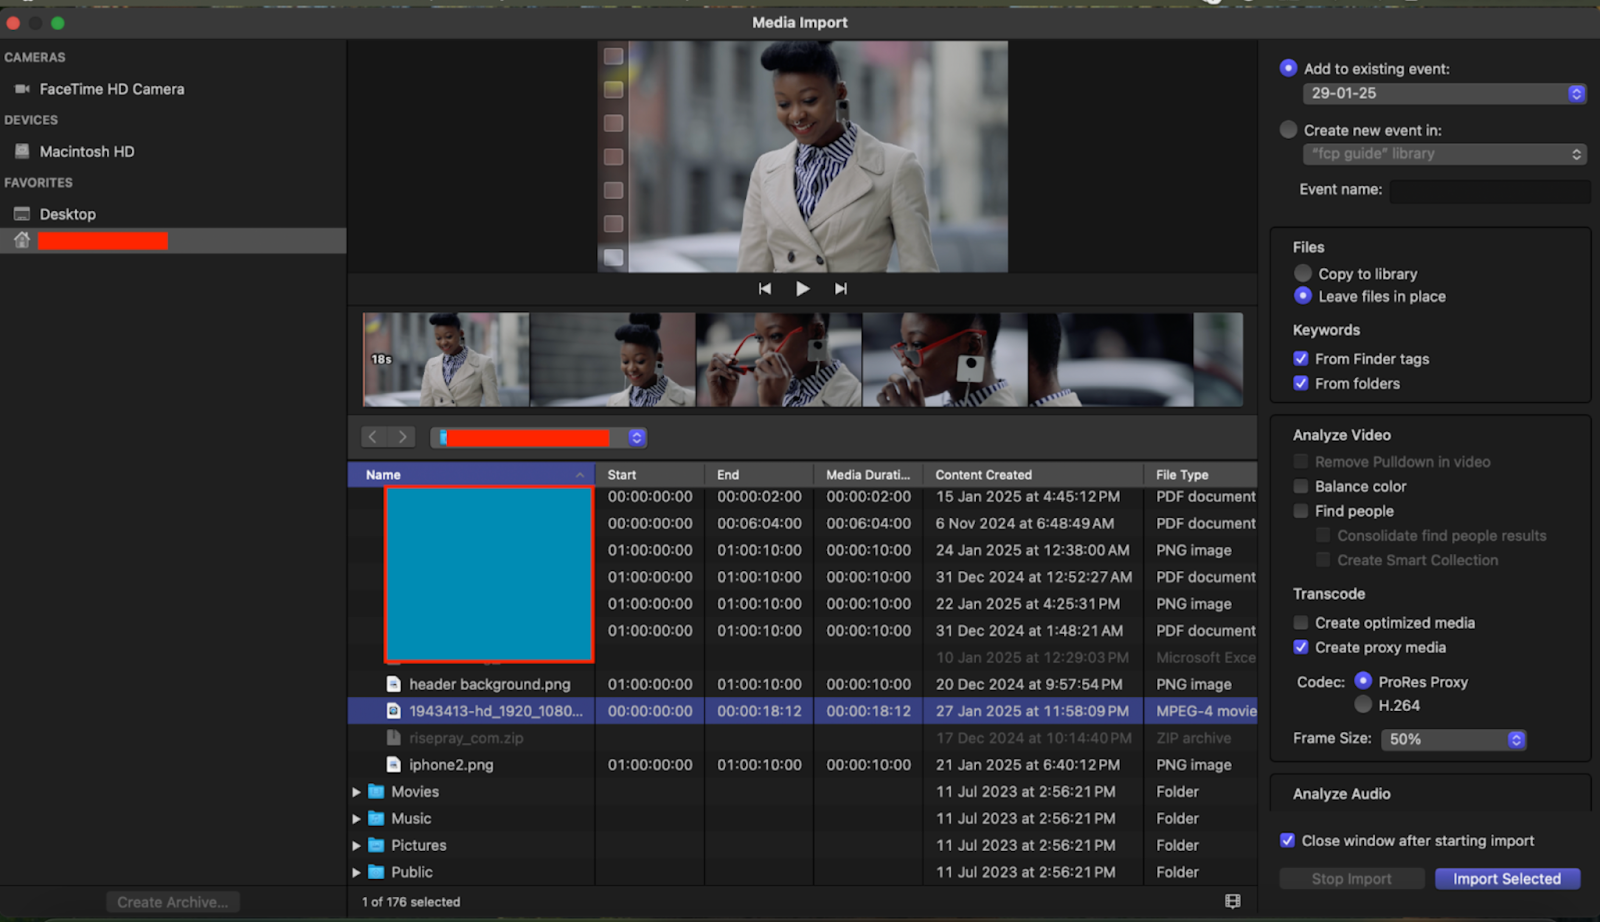
In the screenshot above, the upper right sidebar has various settings for importing files. You can choose to import your files into different existing Events or create new Events directly with these files.
In the files section, the default selected option says “Leave Files in Place.” This prevents making an extra copy of the file in the Library, minimizing the storage space it takes.
Speaking of storage space and performance, you can also use the transcoding feature to lower your files’ resolutions for a lag-free editing experience, without compromising the final files’ quality. To choose lower quality while editing you can select “Create Proxy Media” or if you want to edit with original high quality file can select “Create Optimized File.”
You can also choose your desired frame size at your convenience.

Once you have imported your first files to a new Project or Event, the big import button will disappear. To import new files to your Project/Event, you can click on the “Downward Arrow” in the upper left corner or you can drag and drop your files directly from the Finder.
Make sure to select your Event or Project before you drag and drop files/folders into the FCP Window.
Note: Files can not be dropped directly into the Library. You should either select an Event or Project to drag these files/folders into or just drag the files directly into the Event under the Library.


Keyword Collection
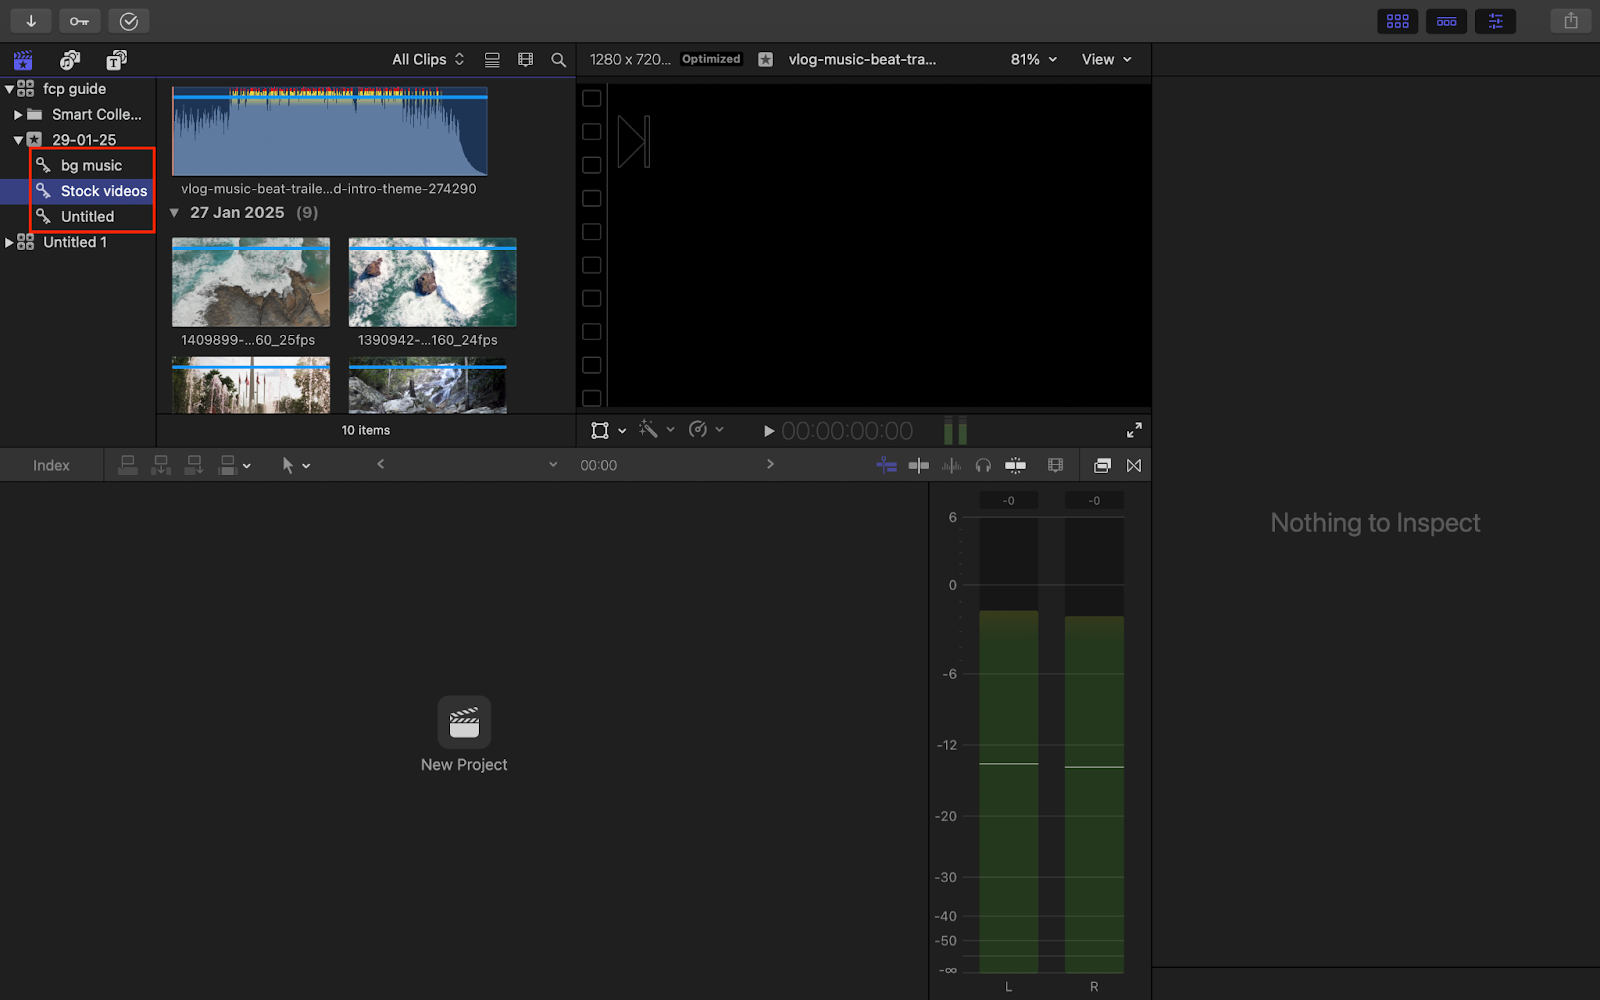
Whenever we import folders in an Event, they are automatically set as “Keyword Collections,” which helps in the organization of various media files (video, audio, etc). Keyword Collections are represented by a “Key” icon.
You can also make a new Keyword Collection by going to the Event, where you want to create it, or by clicking on the existing keyword collection of that event. After clicking this, a drop-down menu will pop up, in which you can click on “New Keyword Collection” to create a new collection.
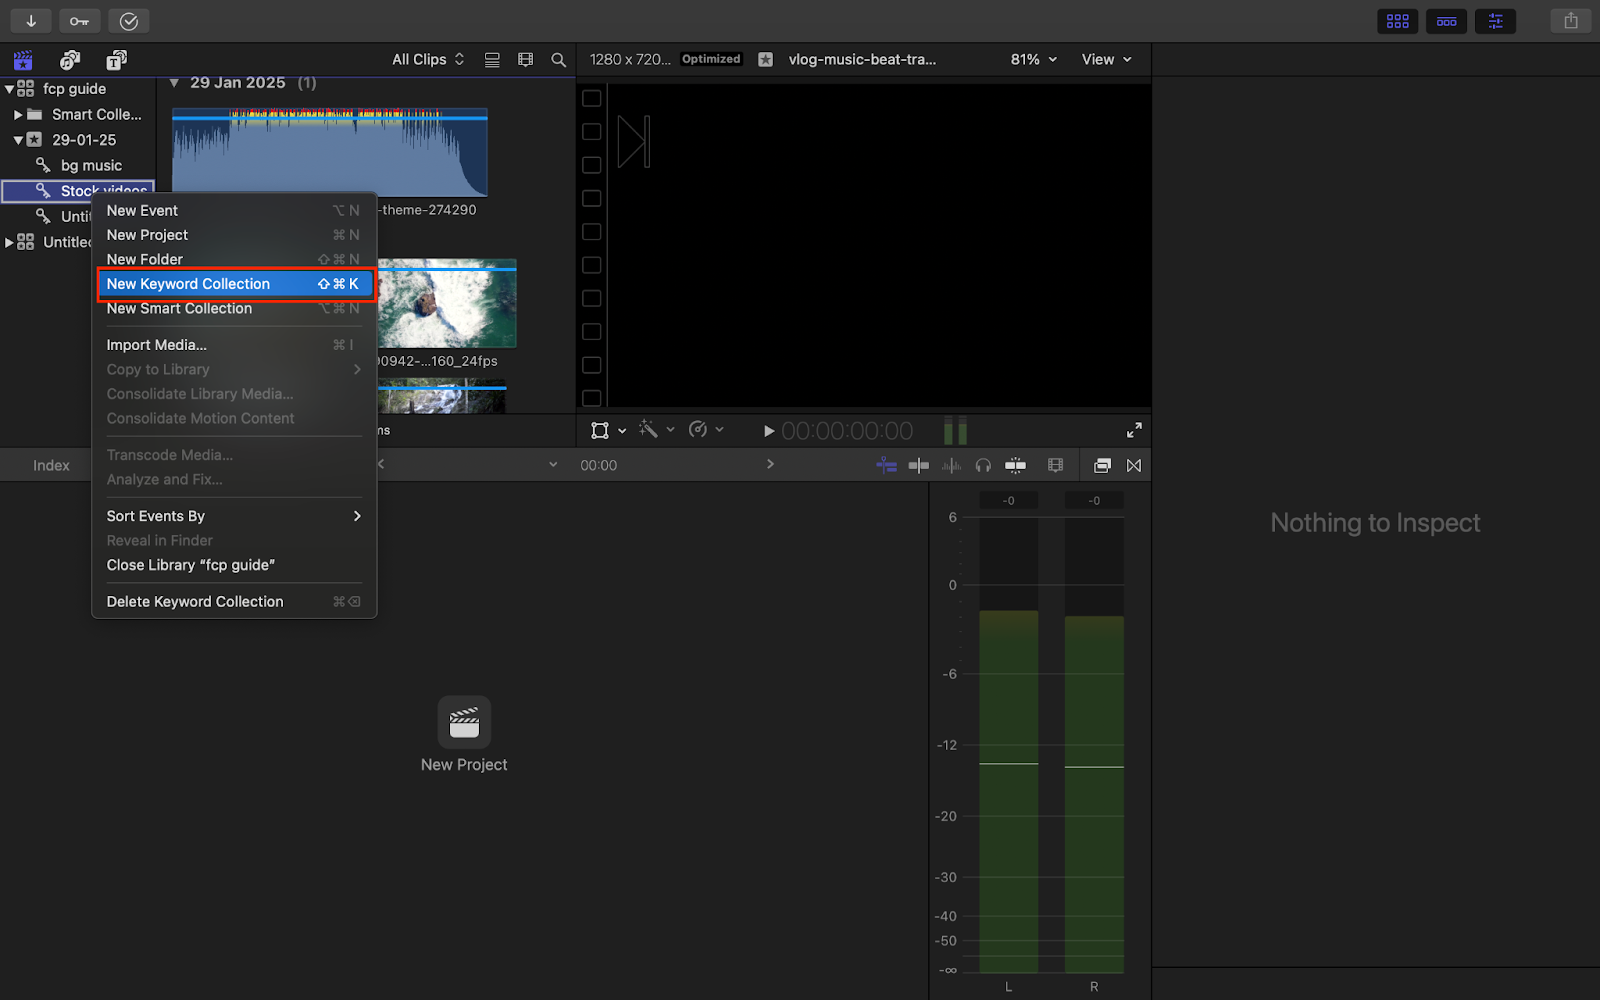
You can use the keyboard shortcut “Shift + Command + K” to create a new Keyword Collection in Final Cut Pro.
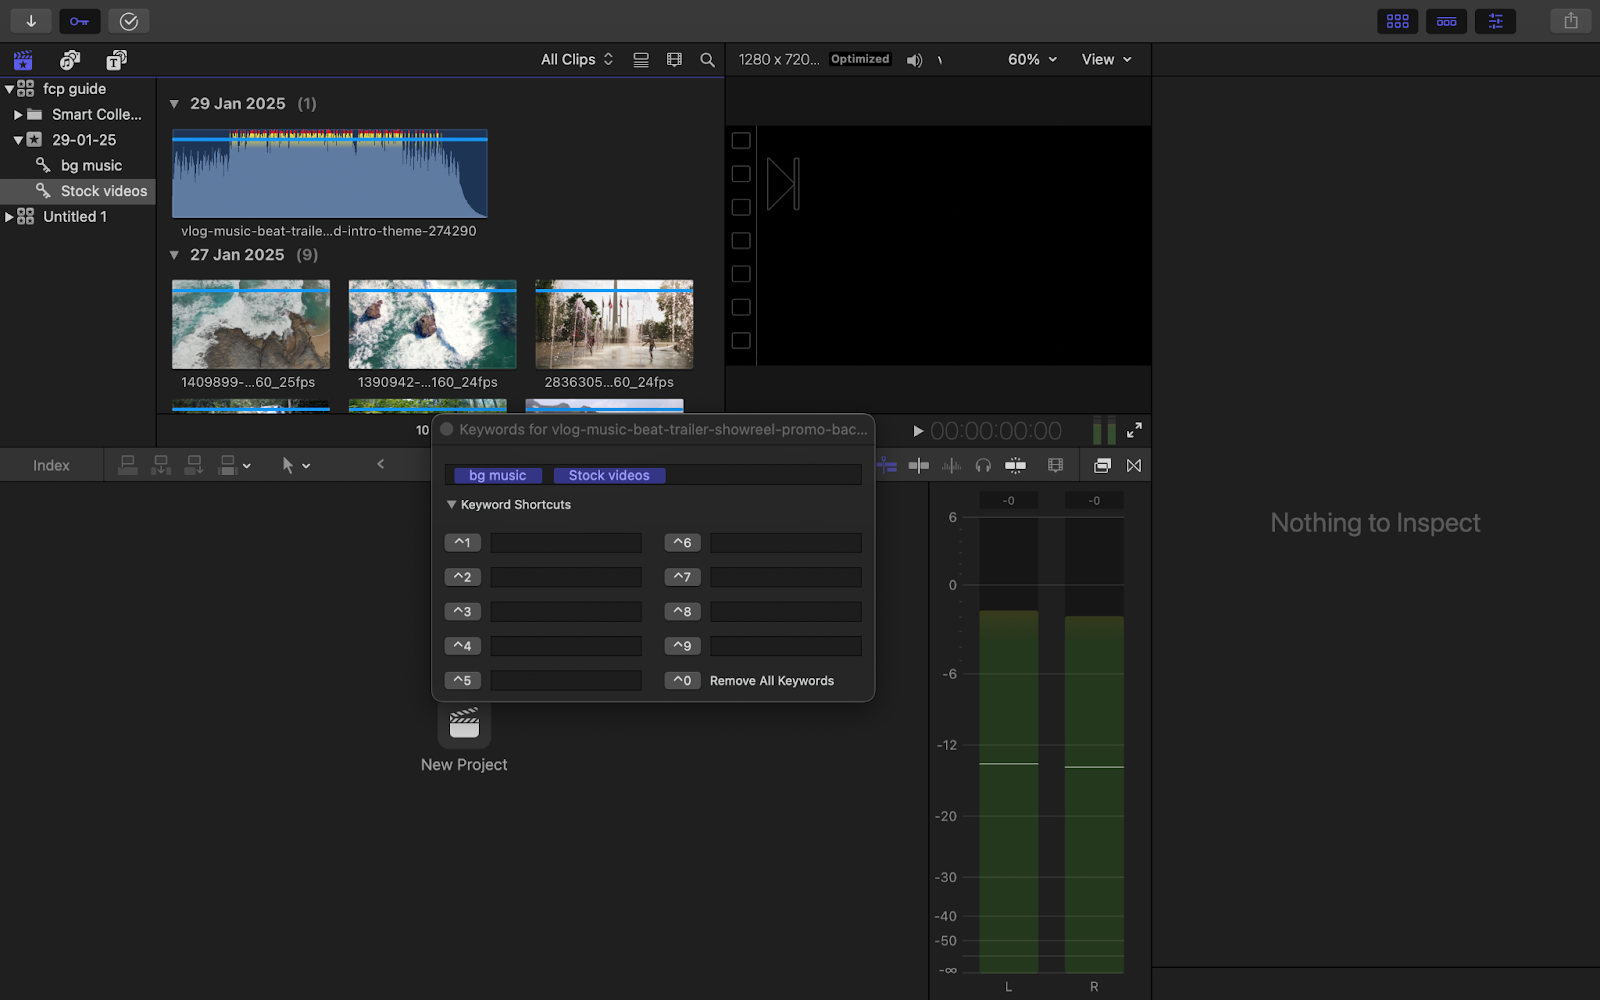
Managing Keyword Collections
The Key icon in the top left corner is the “Keyword Editor” that allows you to manage all Keyword Collections.
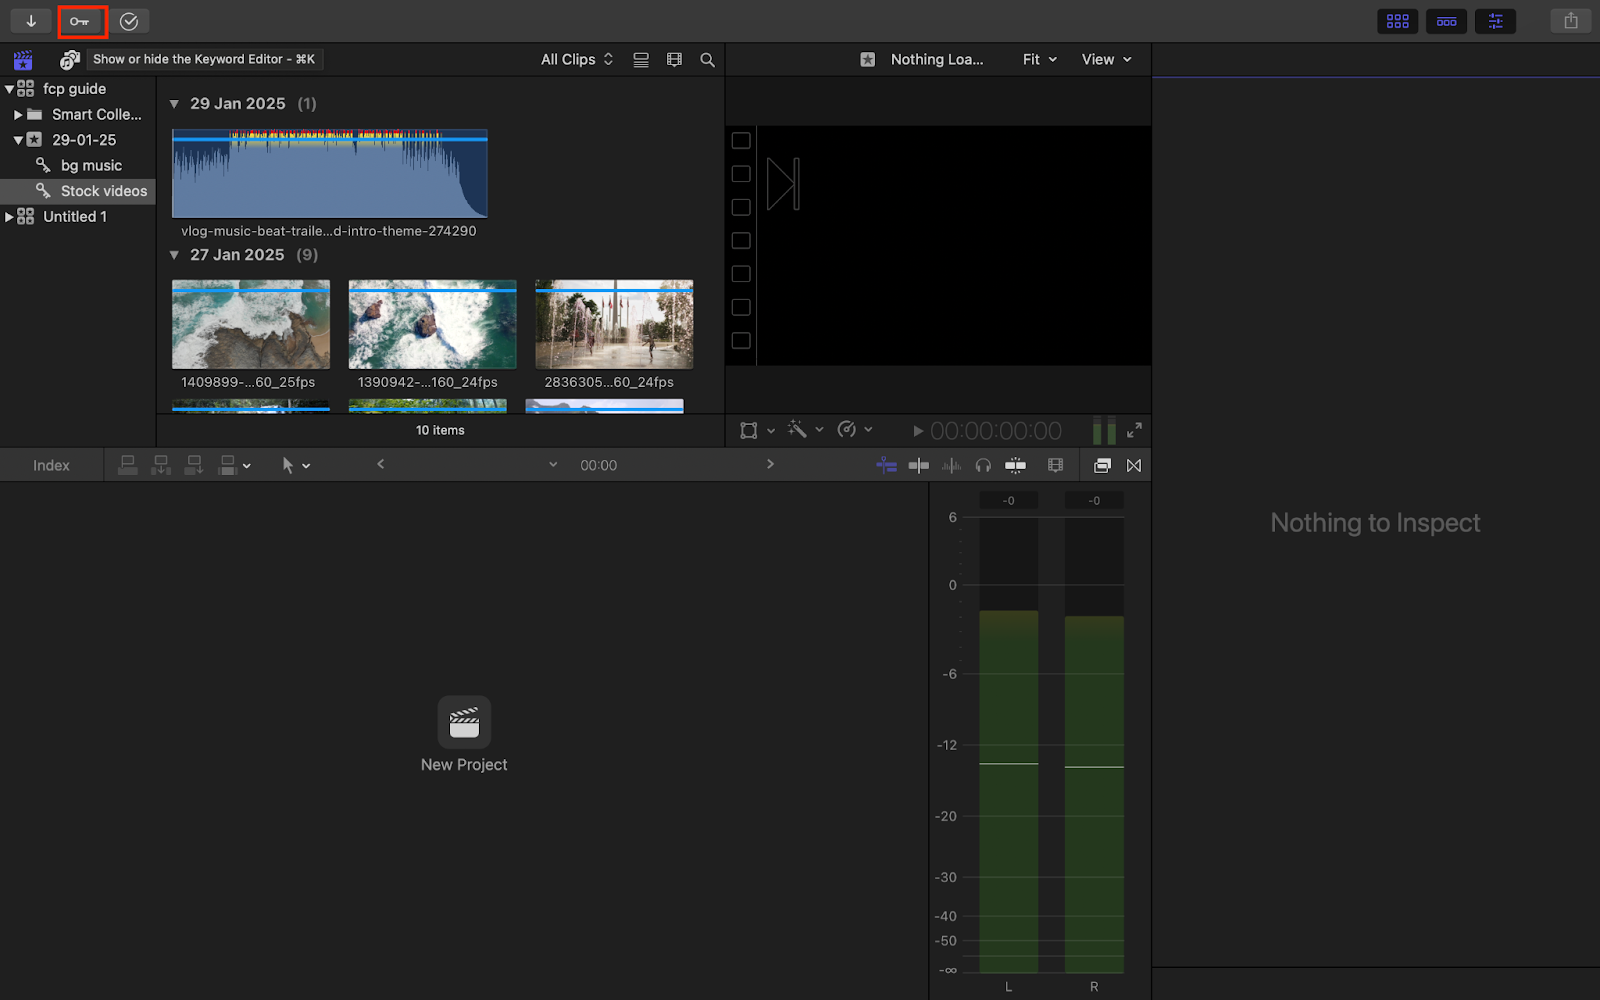
To manage your Keyword Collections, you can click on this Key icon and start making your edits.
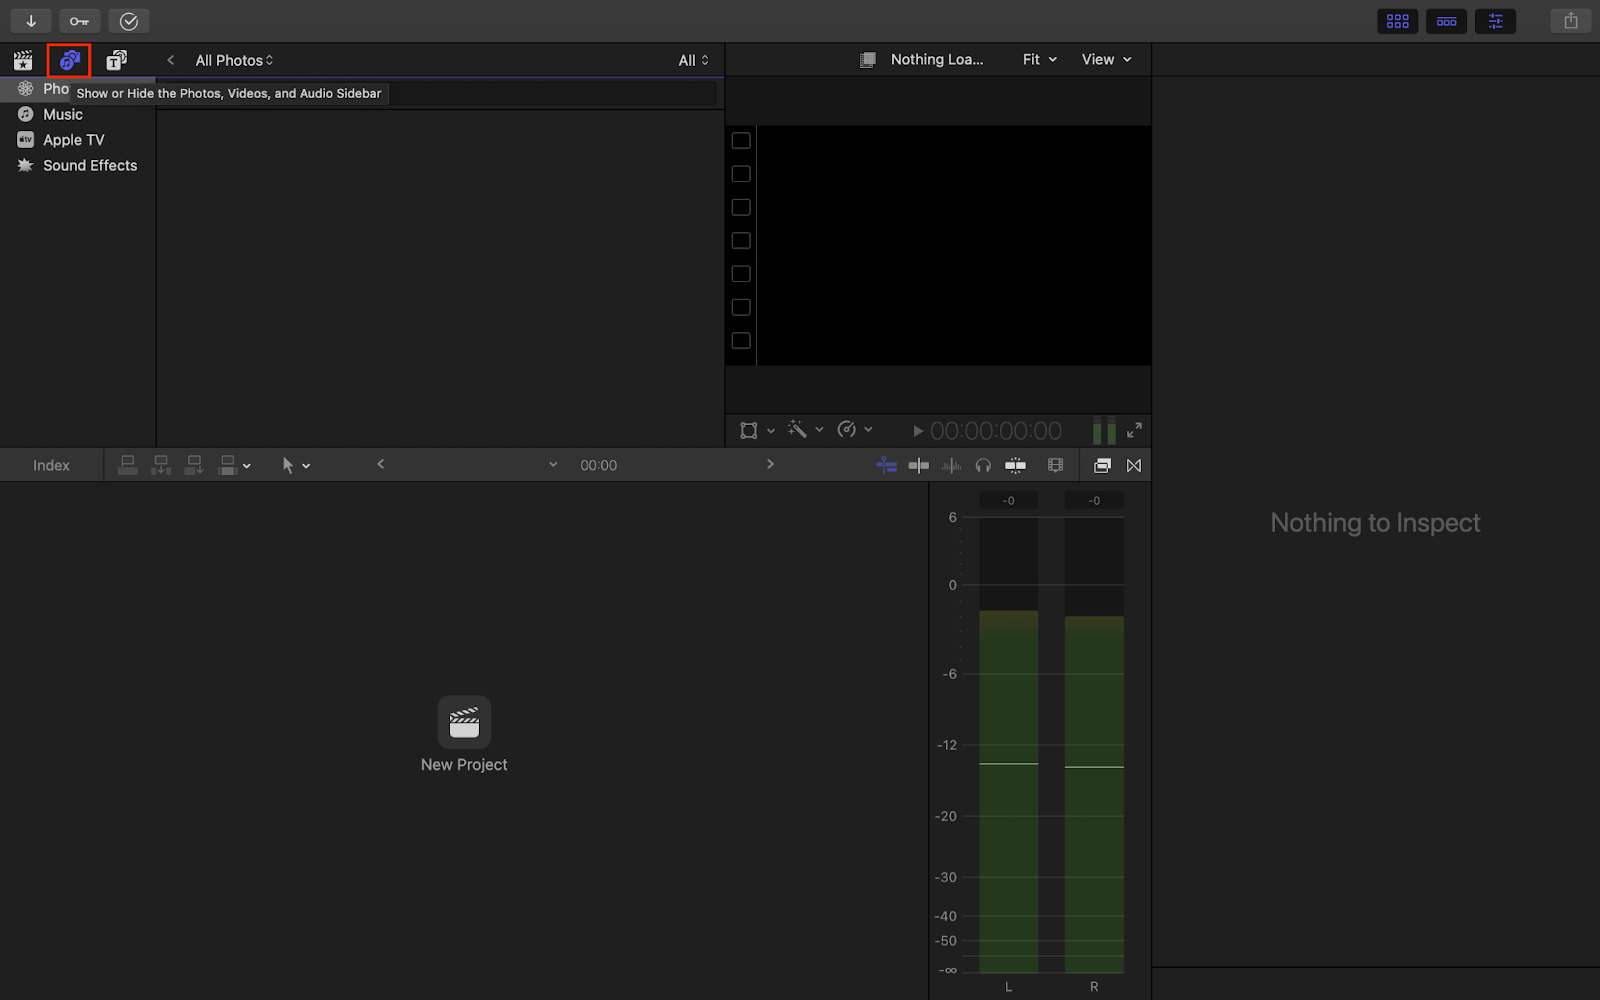
Photos, Videos, and Audio Sidebar
It is present on the right side of the libraries sidebar where you can manage and import the content of the photos, music and Apple TV and.
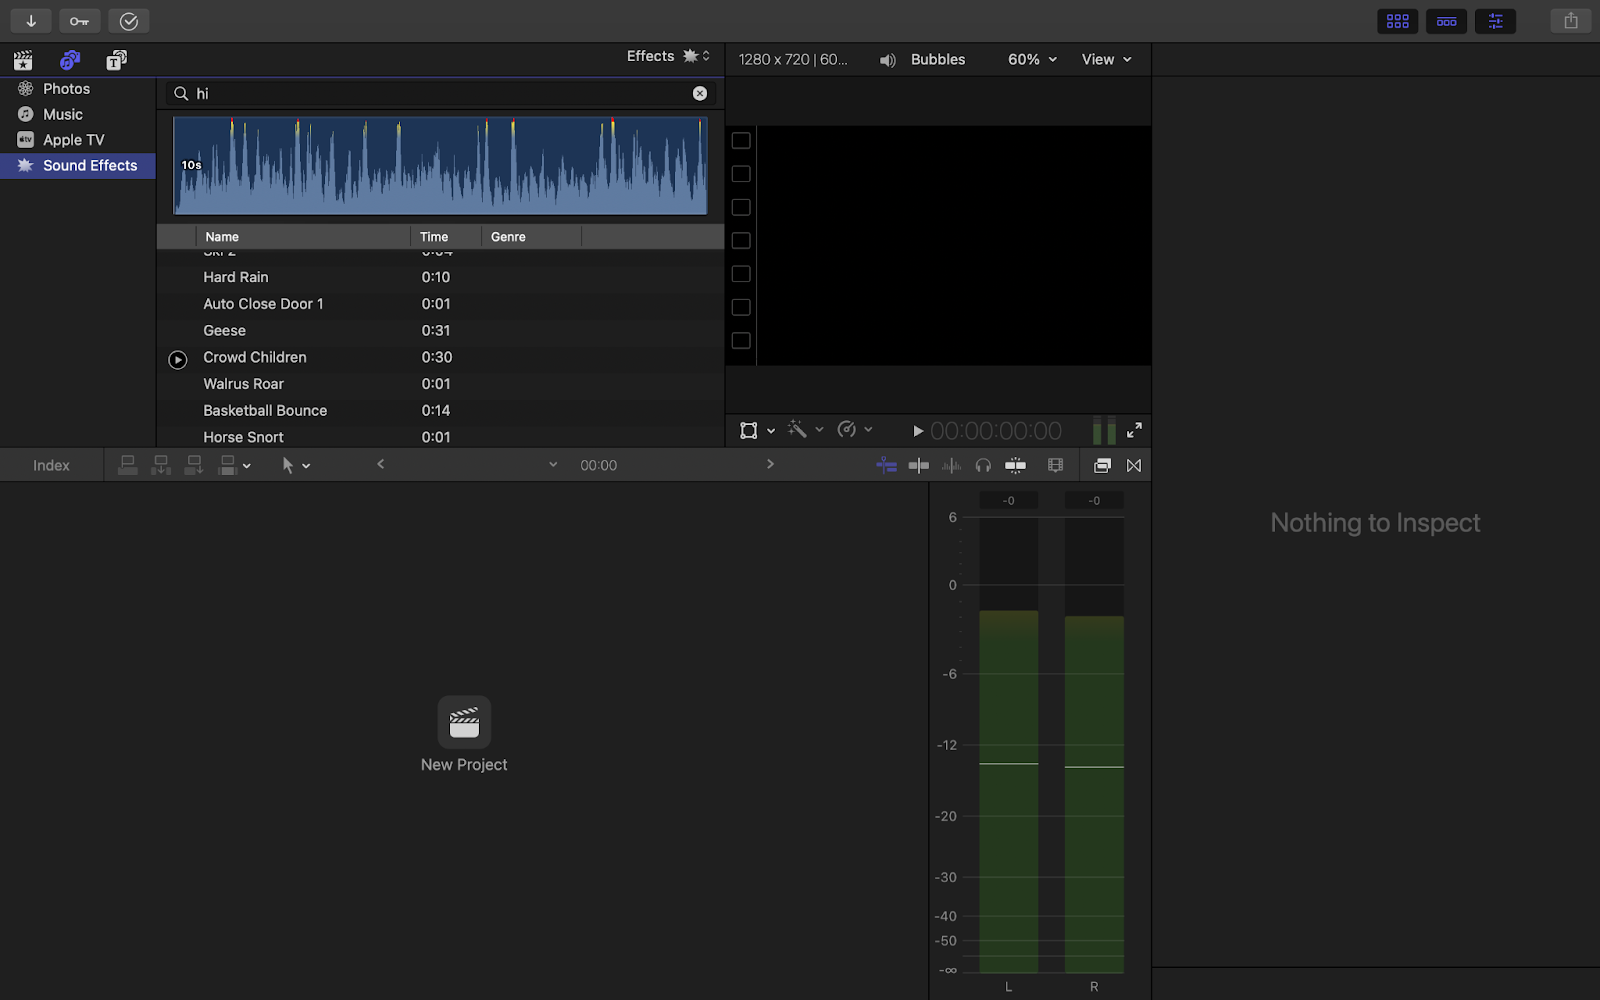
There is also an awesome option of “Sound Effects” where there are multiple built in sound effects to use directly in your projects.
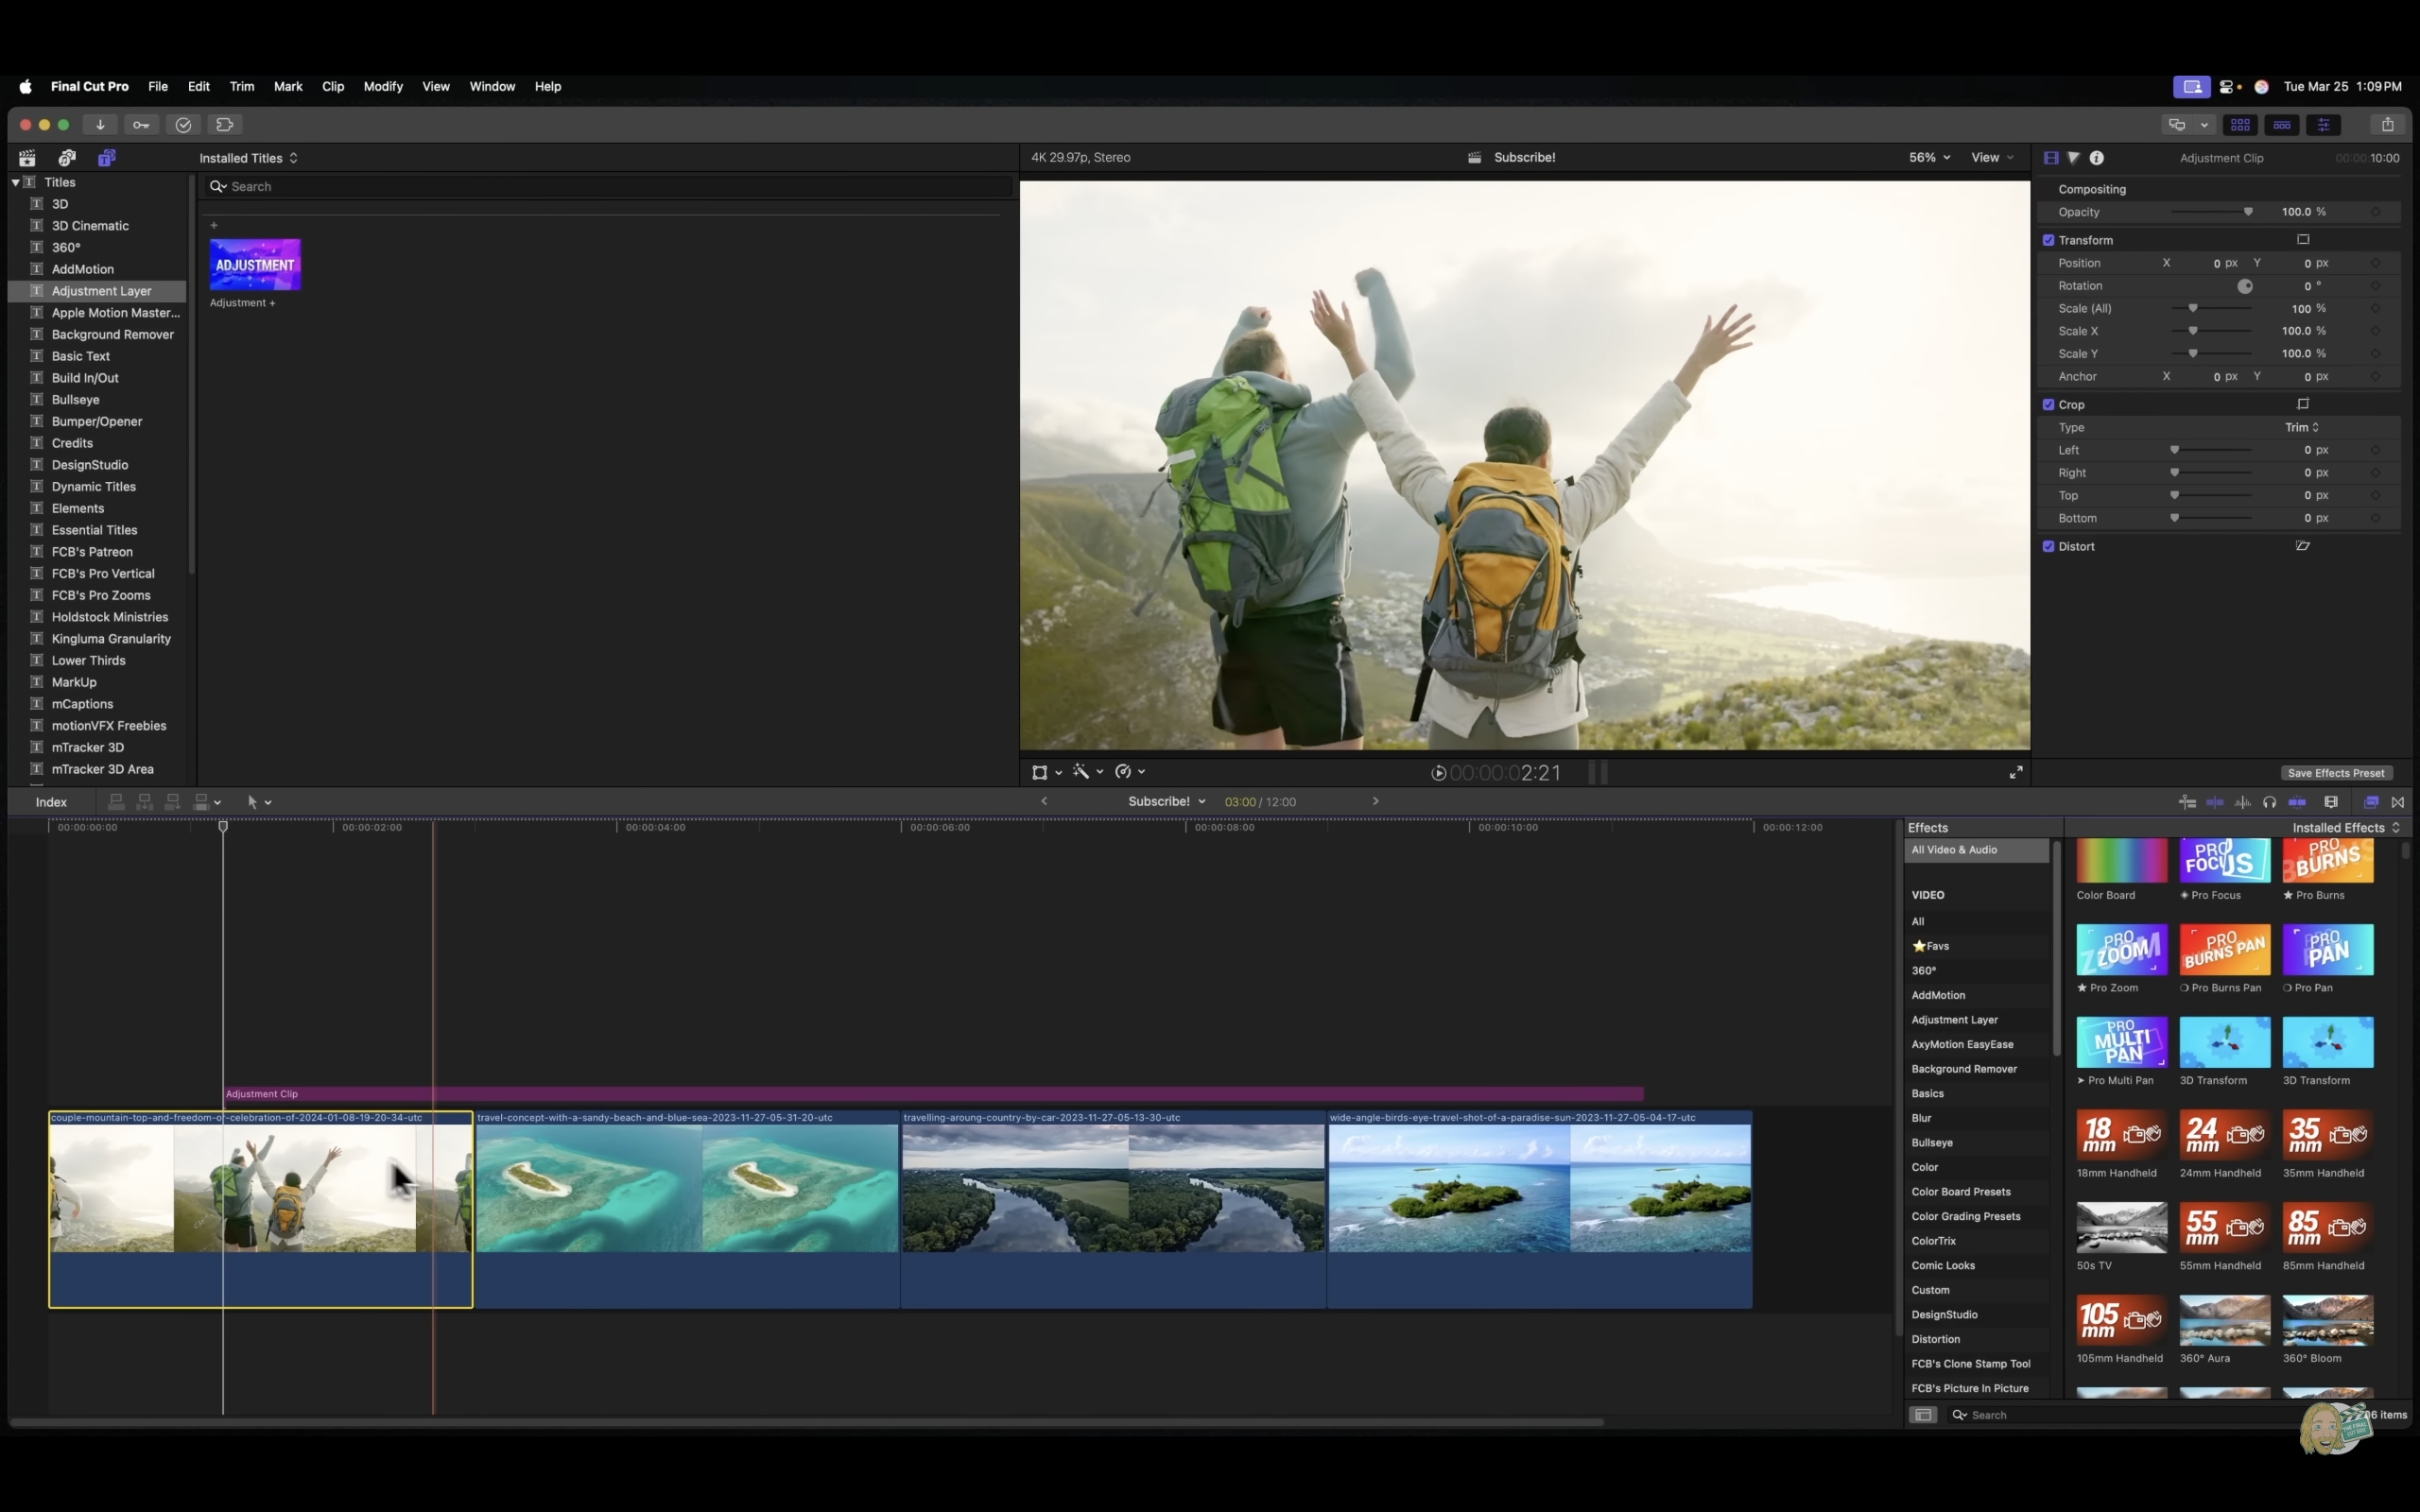
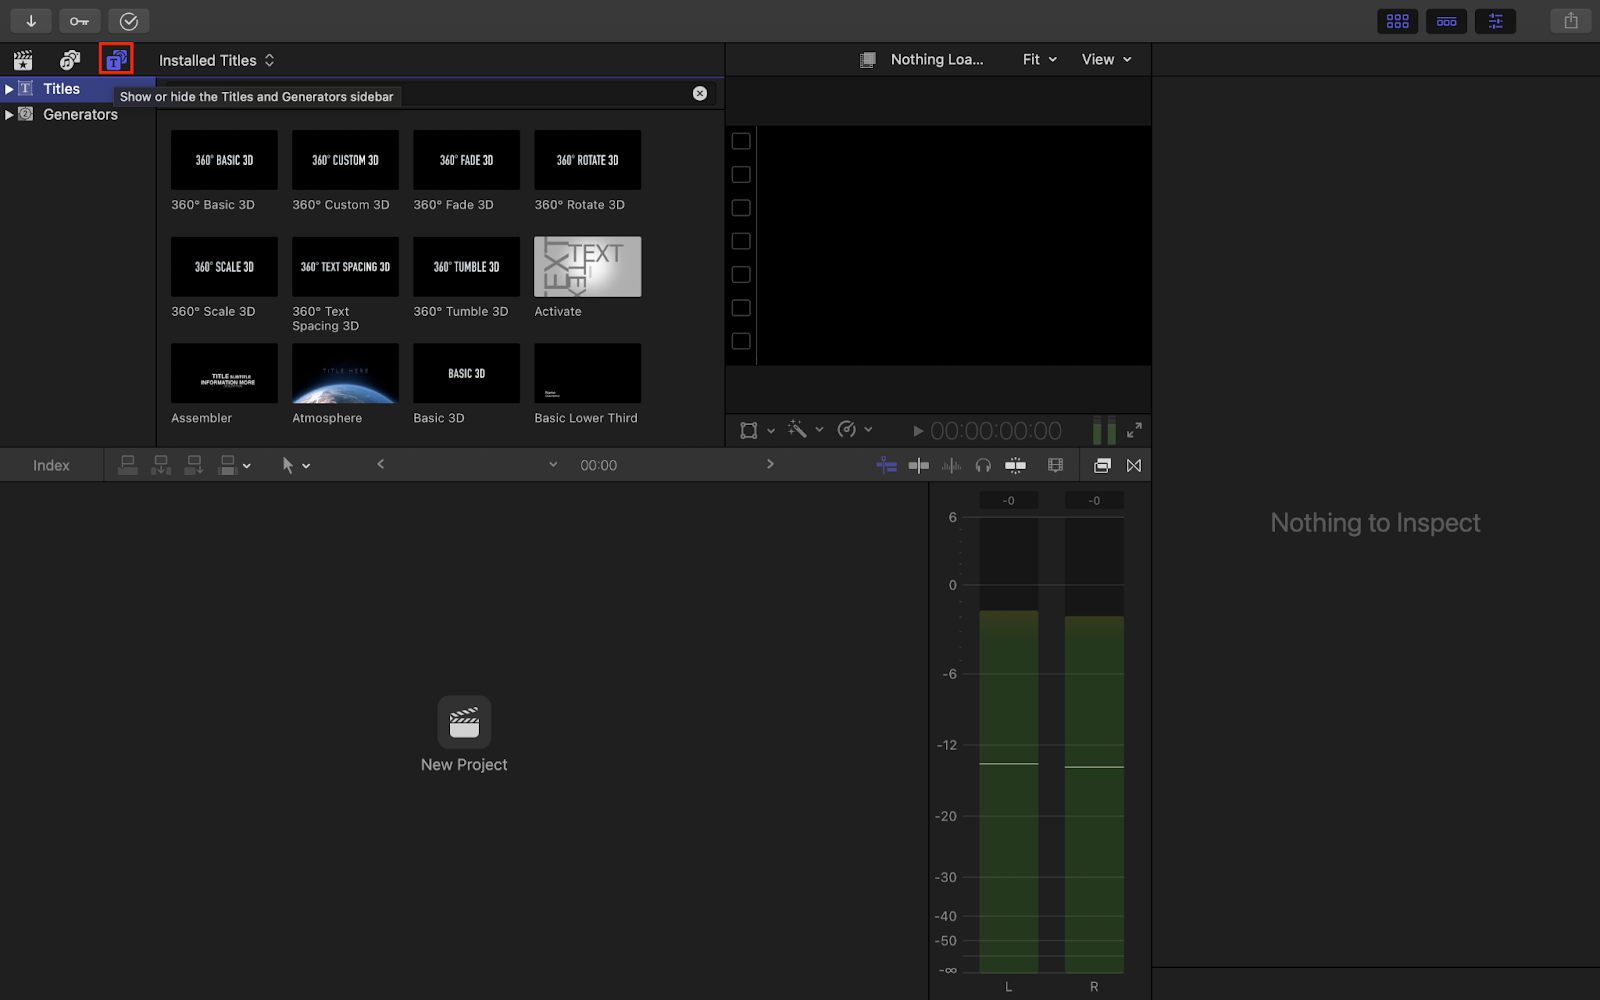
Titles and Generators Sidebar
It is present right next to the “Photos, Videos, and Audio Sidebar”. With the help of “Titles and Generator,” you can add various texts from simple to animated to your video.
In this section, you have plenty of premade templates of titles and generators to use directly to in your project.
- To add texts in your video click on the “Title and Generators” sidebar button and select the “Titles.”
- Now you can pick the title that you want to add in your project. To add a basic title you can search it.
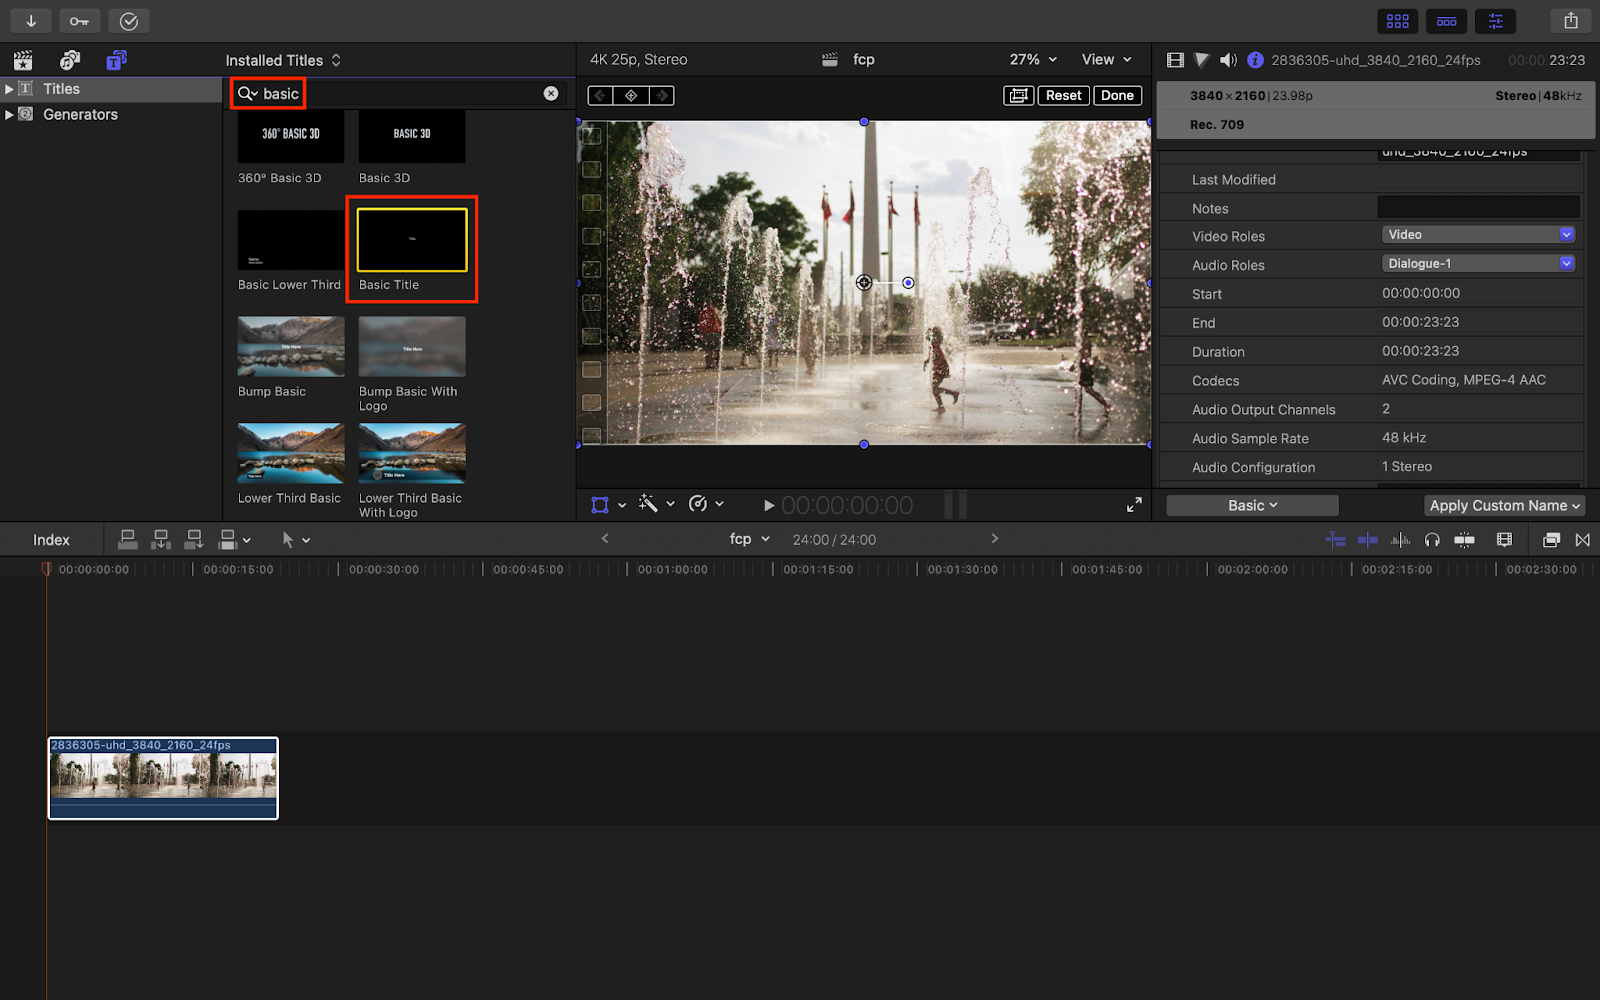
- After selecting your desired title, to add it on the timeline double click on it or can directly drag it on the timeline.

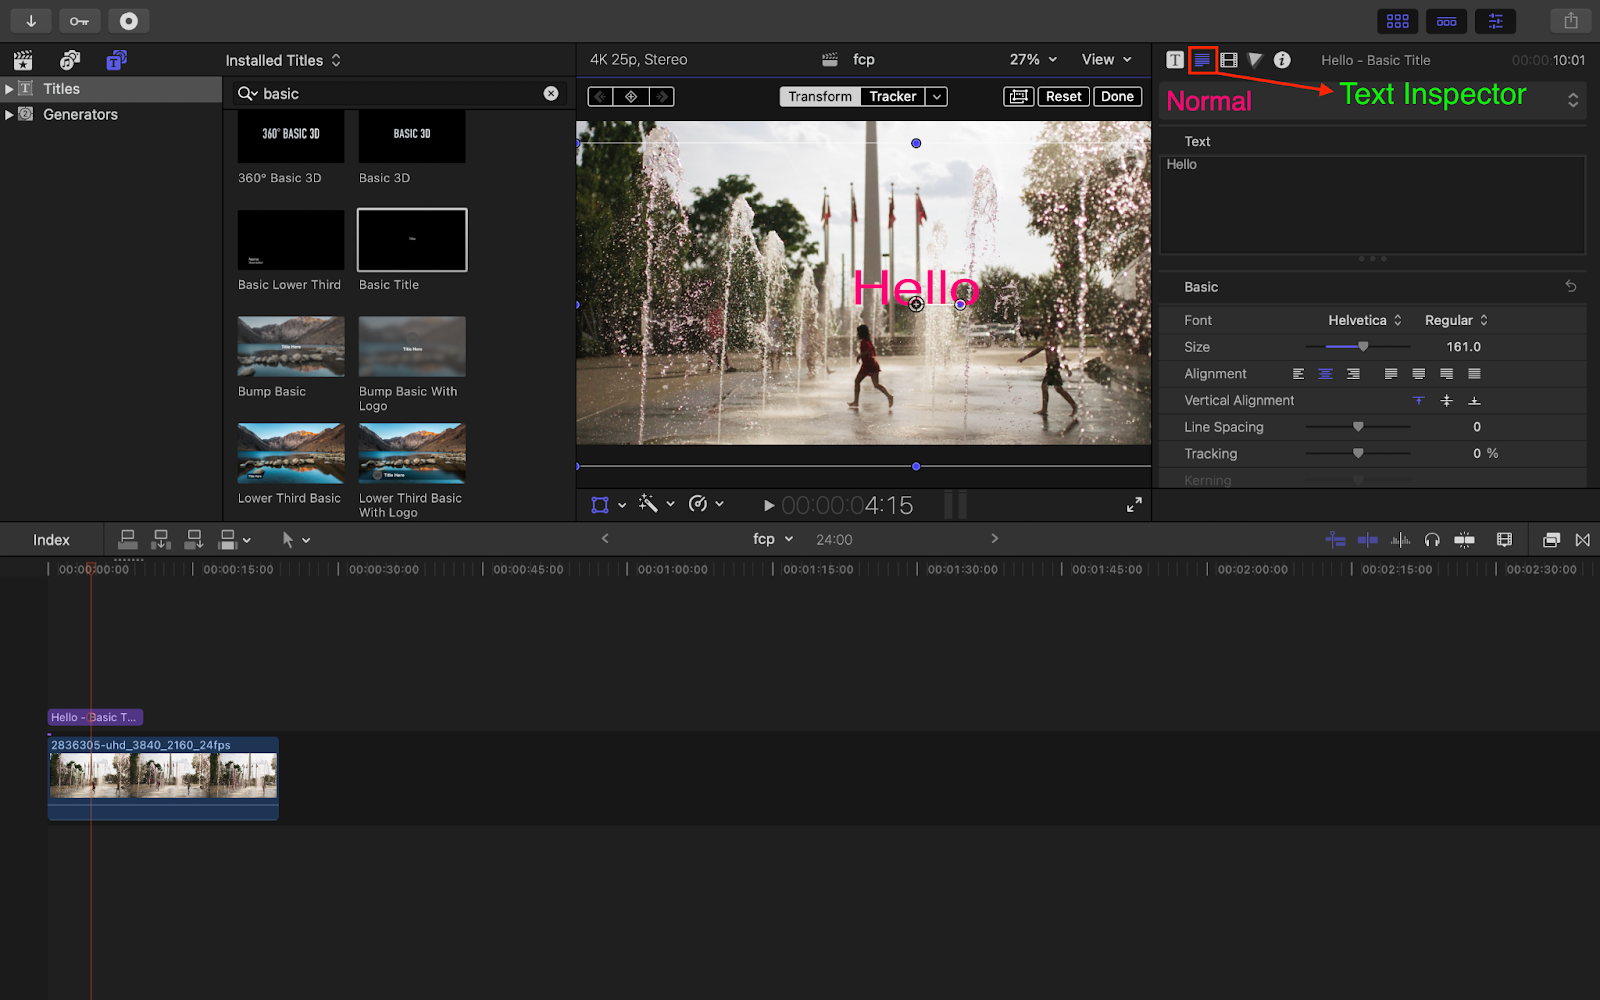
- After that you can edit it in the “Text Inspector” as per your need.
Creating A Project and Starting Editing
To create a New Project use the keyboard shortcut “Command + N.” Once you use this shortcut, this dialogue box will pop-up, asking you to choose the desired settings for your Project. You can use the default settings or you can customize to your choice.
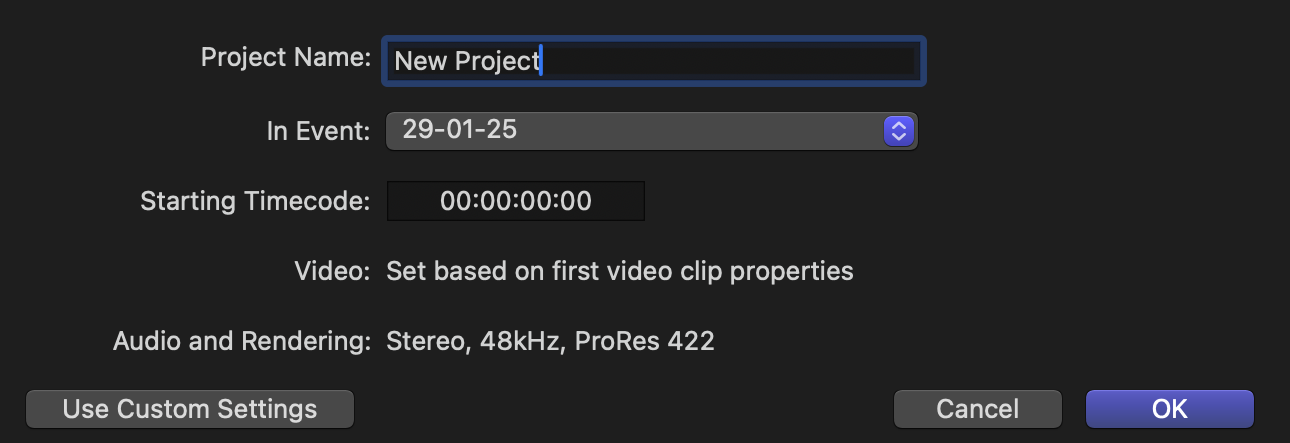
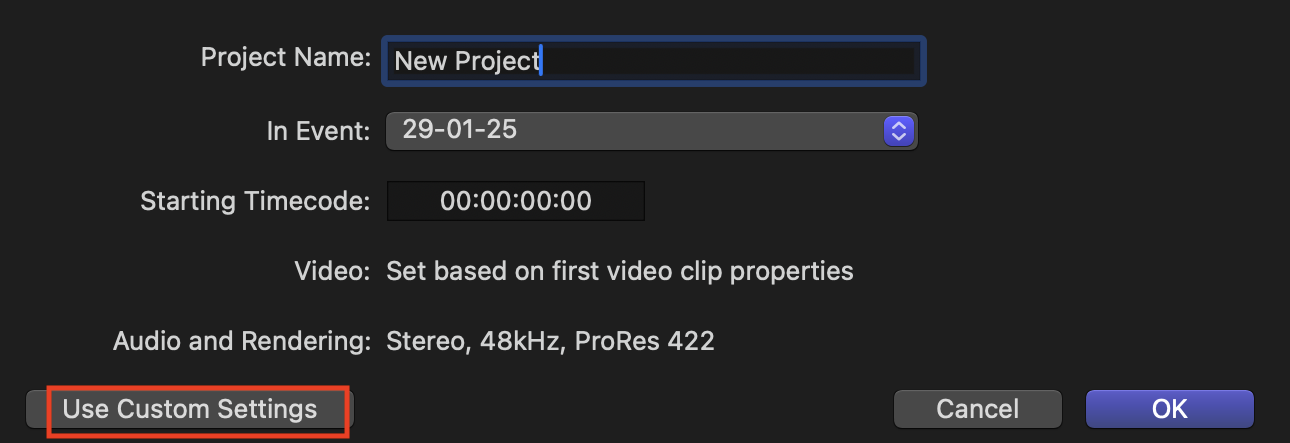
To keep the default settings, click on “OK” and create a New Project. To make changes, click on “Use Custom Settings.”
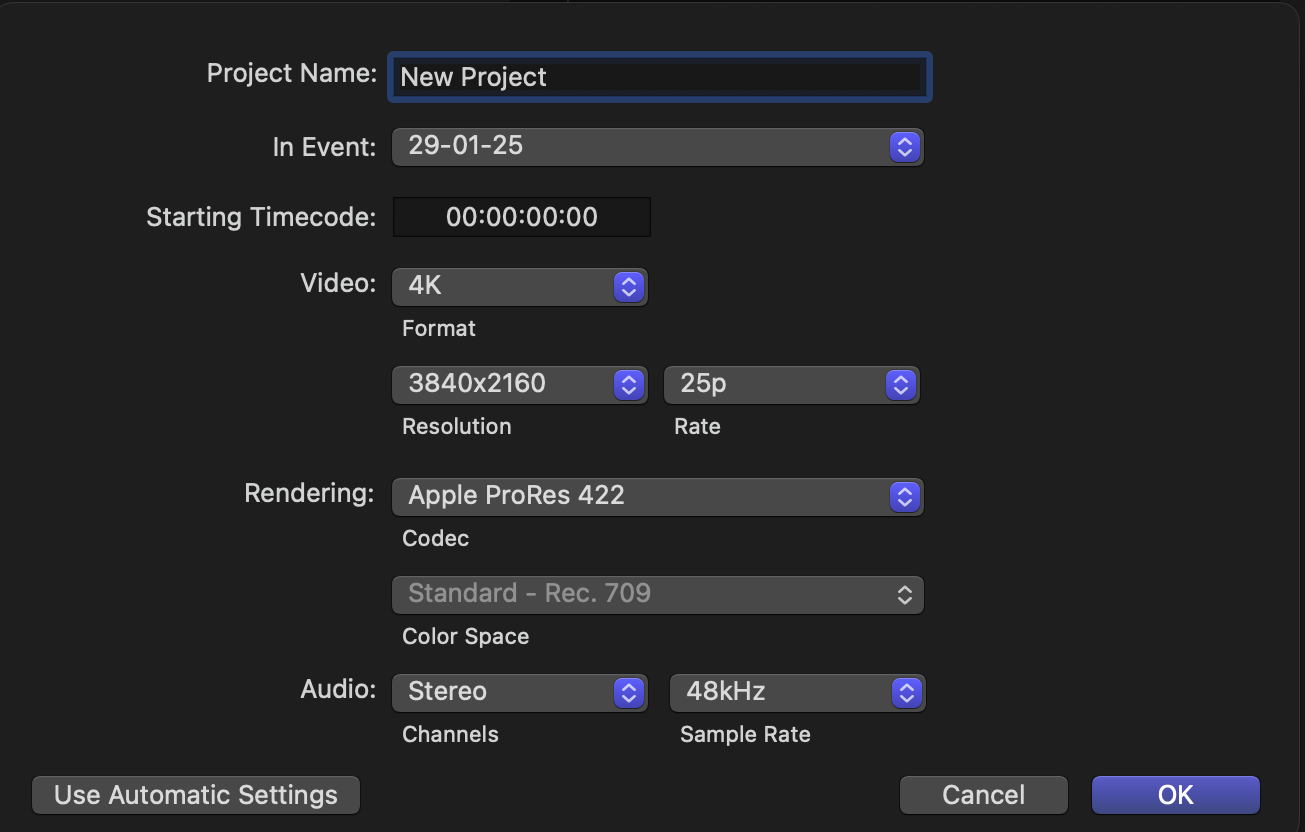
While customizing the settings, you can change the video format, resolution, rendering system, frame rate, audio channels, audio sampling rate, the Event you wish to create this project inside, and the name you want to give to this project.
After creating the Project, you can drag the media you wish to edit into the Magnetic Timeline and start making changes.

Adding Clip to The Timeline
You can add your video and audio clips by directly dragging and dropping them to the timeline. Firstly, click on a particular clip and whenever a yellow border appears around it, drag and drop it to the timeline.
To select a specific part of the video, you can select the part with the cursor and then drop it on the timeline (see the GIF below).
Or you can also use your keyboard for this- scroll through the cursor on the clip, push “I” to select inpoint (starting point of the clip) and “O” to select outpoint (ending point of the clip).
Let’s look at the different options for adding clips to the timeline.
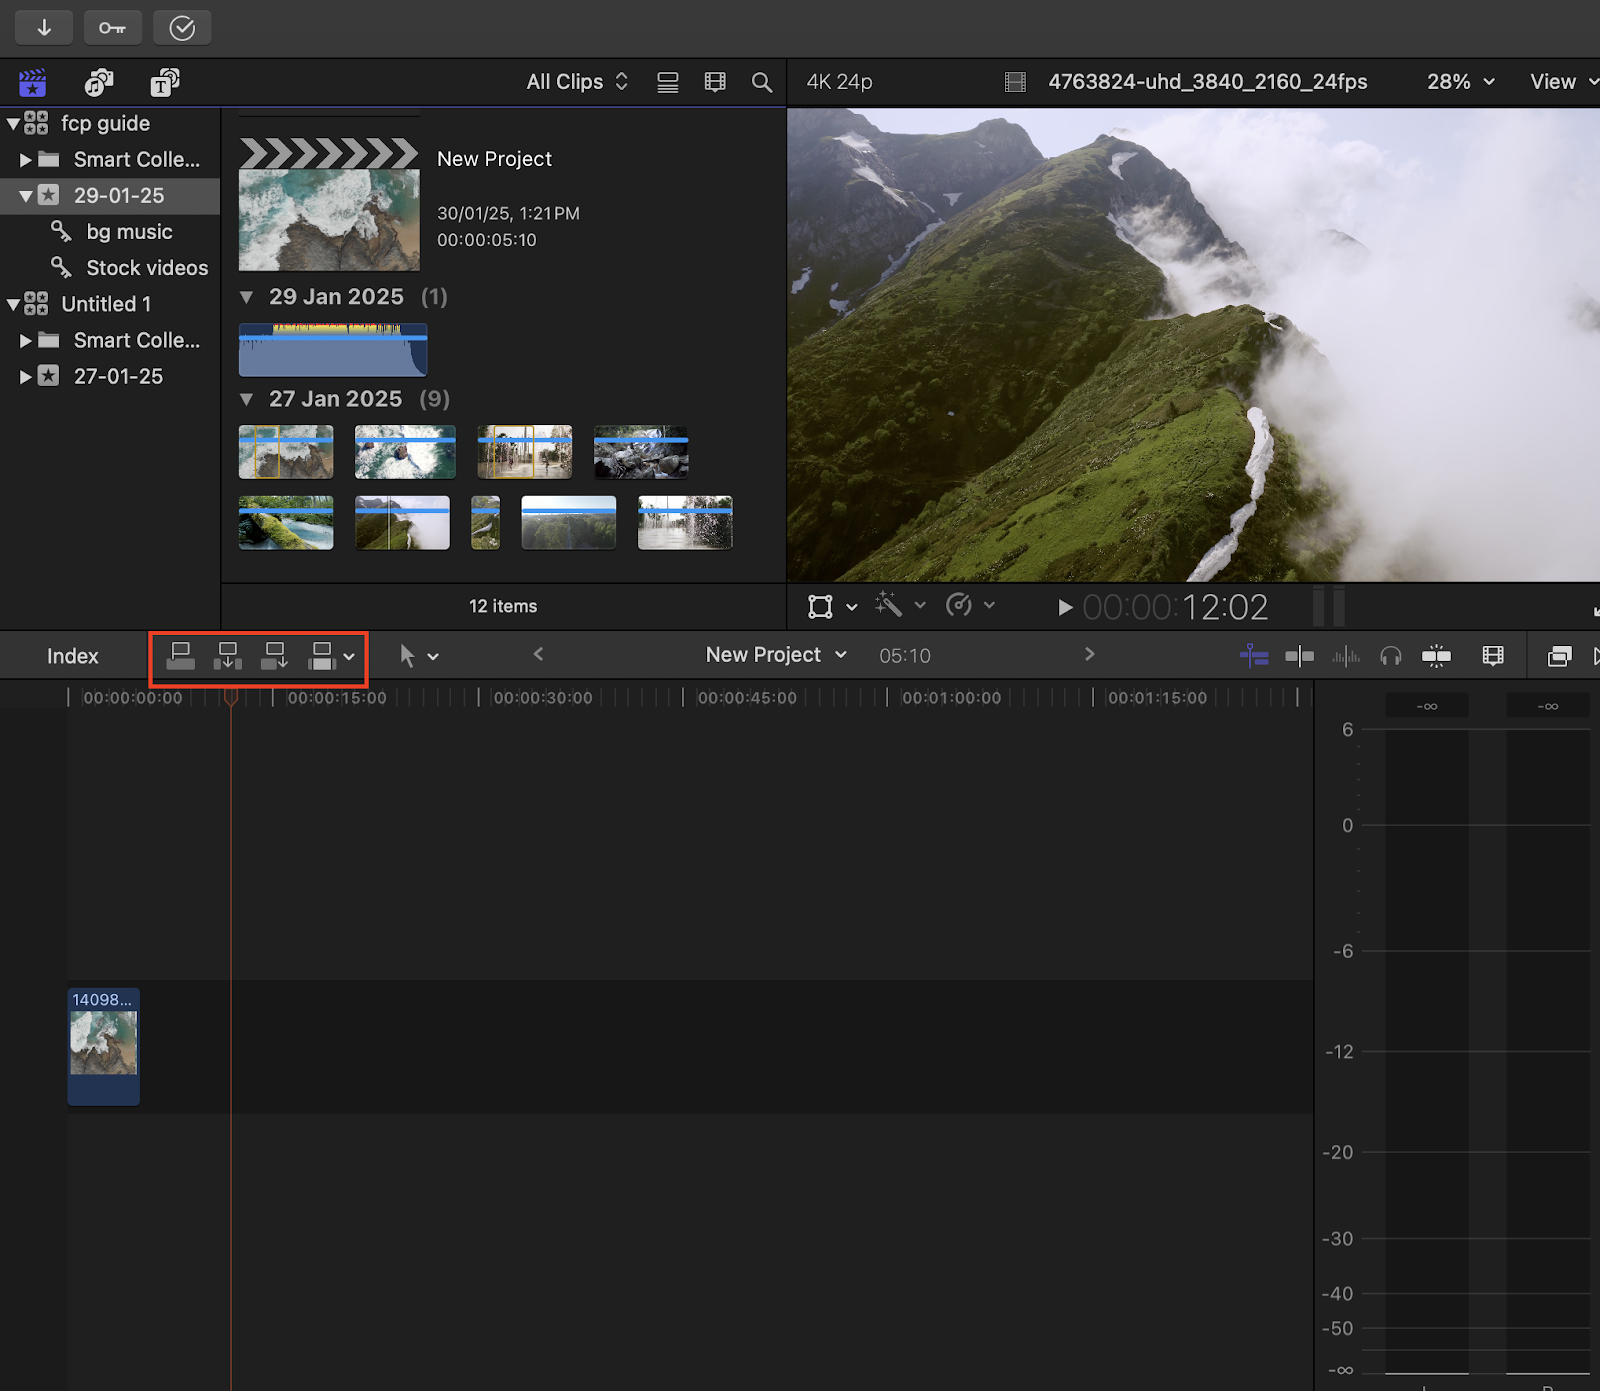
Option 1: Connect the selected clip to the primary storyline
This option lets you Connect the selected clip to the primary storyline. You can do it via a shortcut also- after selecting the clip that you want to connect with the primary storyline, press “Q.”
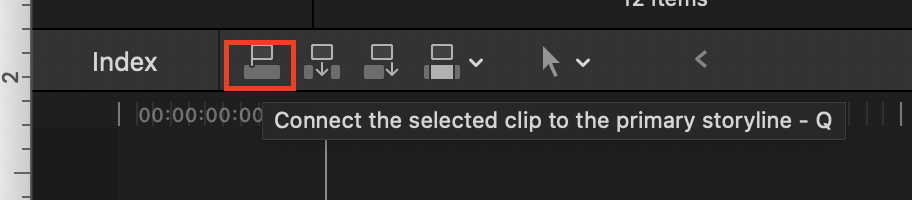
Wherever you place the cursor on your primary timeline, the new clip connects on that point.

Notice the connection point between the clips in the screenshot below.
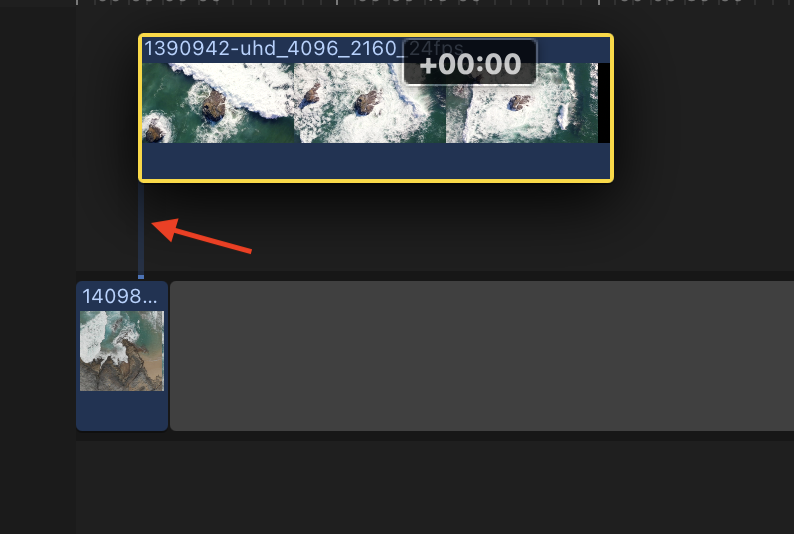
You can readjust the clip by dragging and dropping.
 |  |
Option 2: Insert the selected clip in the primary storyline or the selected storyline
The second option allows you to insert the selected clip into your primary storyline or selected storyline. You can also use a shortcut for it- after selecting your clip, press “W.” To insert the clip, you have to adjust the red Cursor/Skimmer where you want to insert it.

With the help of this option, you can add a new clip with selected storyline. Shortcut- select the clip and press “T.”

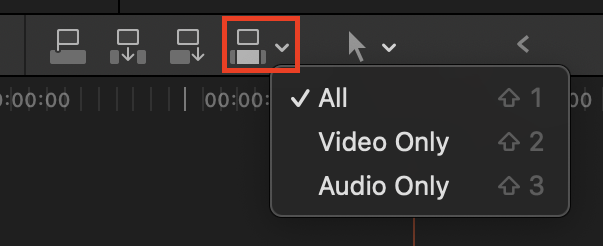
Option 3: Overwrite clips on any part of the selected timeline
Overwriting clips on any part of a timeline can help you quickly make changes to your end results. For shortcut, select a clip, press “D,” and place your red line/skimmer where you want to overwrite your clip.

You can also overwrite only video or audio.
Editing Tools
After adding clips to the timeline, it’s time to make your edits. The following tools make editing magical in FCP.
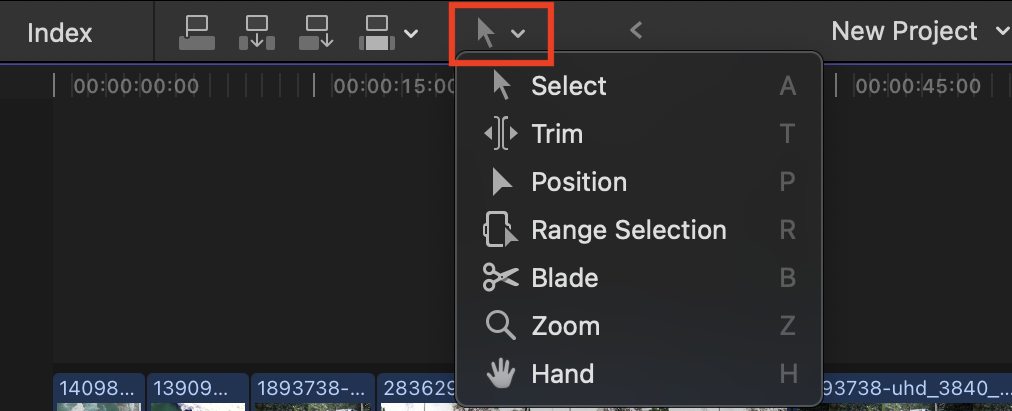
Select
Select tool is used to select various items on the editing screen. To select the “Select Tool,” just press “A” as a shortcut.
Trim
To trim a clip, place your mouse cursor at the edge of your clip. Move the cursor in the direction you want to trim the video in. If you see the edge turning red, that means there is no longer any media in that selection, however, you can still trim it in the opposite direction.
Blade
Another efficient way to make cuts in FCP is by using the Blade tool. You can select it from the toolbar or just press “B” and you will get a scissor to make cuts.
Go to the Timeline and click at the starting point where you want to start cutting from and then click on the end point where you want to end the cut. After this, go back to the toolbar, pick the “Select” tool, select the new cut clip and drag and drop it to the place where you want it to appear in the Timeline. You can also press “Delete” to remove this portion from your Timeline.After clicking, you will see a dotted line that represents the continuation of the previous part and when we play then we would never notice that there is a cut, whereas a solid line represents an entirely different clip.

PRO TIP: You can access the “Blade” tool by holding the key “B” and make cuts (as many as you want) while still holding it. Don’t leave the key until you are done making cuts. Once you leave the “B” key, FCP will automatically switch back to your last used tool. You can use it for all other tools by holding their shortcut key. It can increase your editing speed.
Zoom
With the help of this option, you can zoom in and out on the timeline. To use this, press the keyboard shortcut “Command +” or you can do it by zooming in/out on your trackpad or double tapping the middle of your Apple Mouse.

Range Selection
With this tool you can select a custom range of your clips, within the one clip or across different clips. To select the range select “Range Selection” (or press R) in the toolbar. After selecting, click on the part of the Timeline where you want to start and drag it in the direction you want to select. After selecting it you can apply your edits to this specific part.
Position
Position tool lets you arrange clips without affecting the timings of the other clips. With the help of it you can overwrite a clip over another clip.
Hand
The Hand tool allows you to see your Timeline without changing it accidentally.
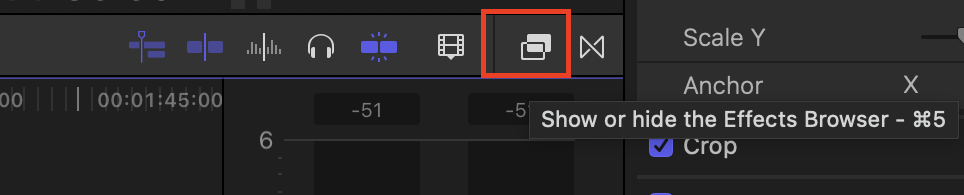
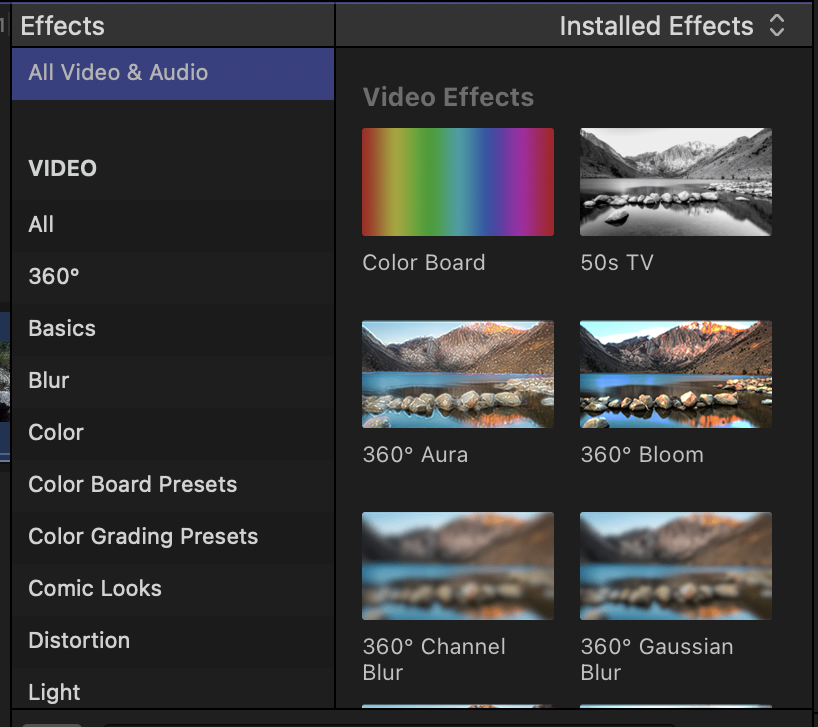
Editing Effects
Effects play a vital role in video editing and enhance the output of your edits. You can check various effects in the “Effects Browser” present on the upper right part of the Timeline.
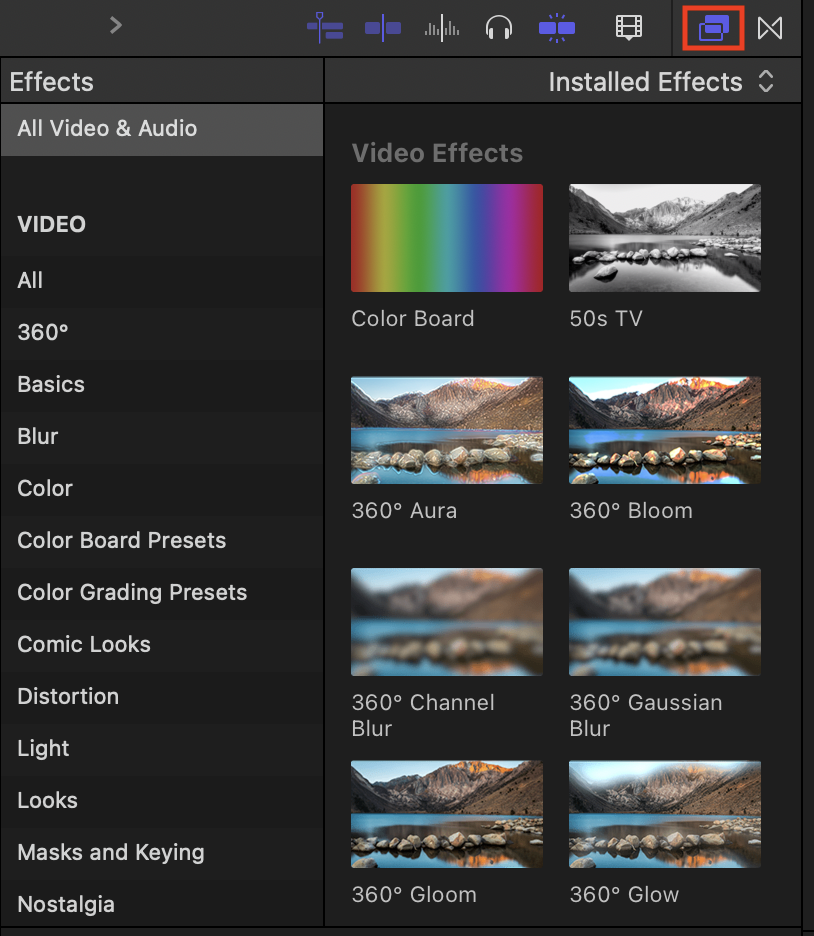
Color Correction/Grading
Color correction tools allow video editors to fix or customize color settings in their projects. To use color correction, open the “Effect Browser” and select the “Color Board” at the top. Color Board is the default way to color grade in Final Cut Pro.
To apply a Color Board, drag and drop it on the clip where you want to use color correction.
You can see the applied effect in the “Video Inspector” present at the right corner of the screen.
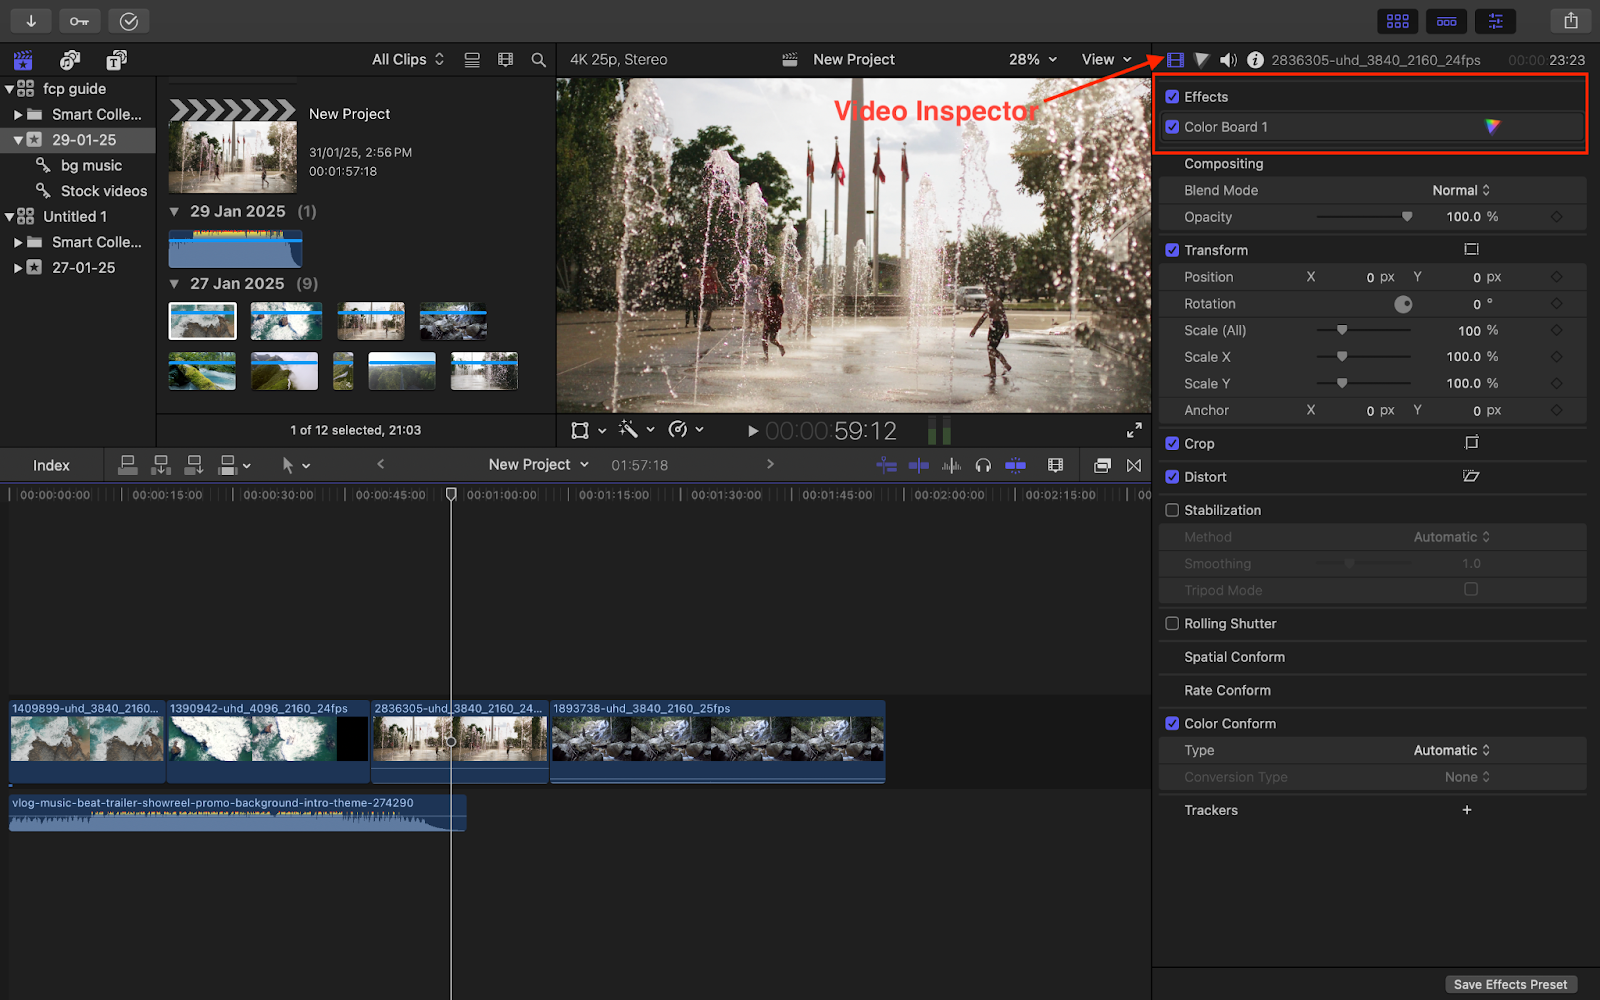
“Color Inspector” is present next to the “Video Inspector,” where you can adjust all the settings related to color grading.
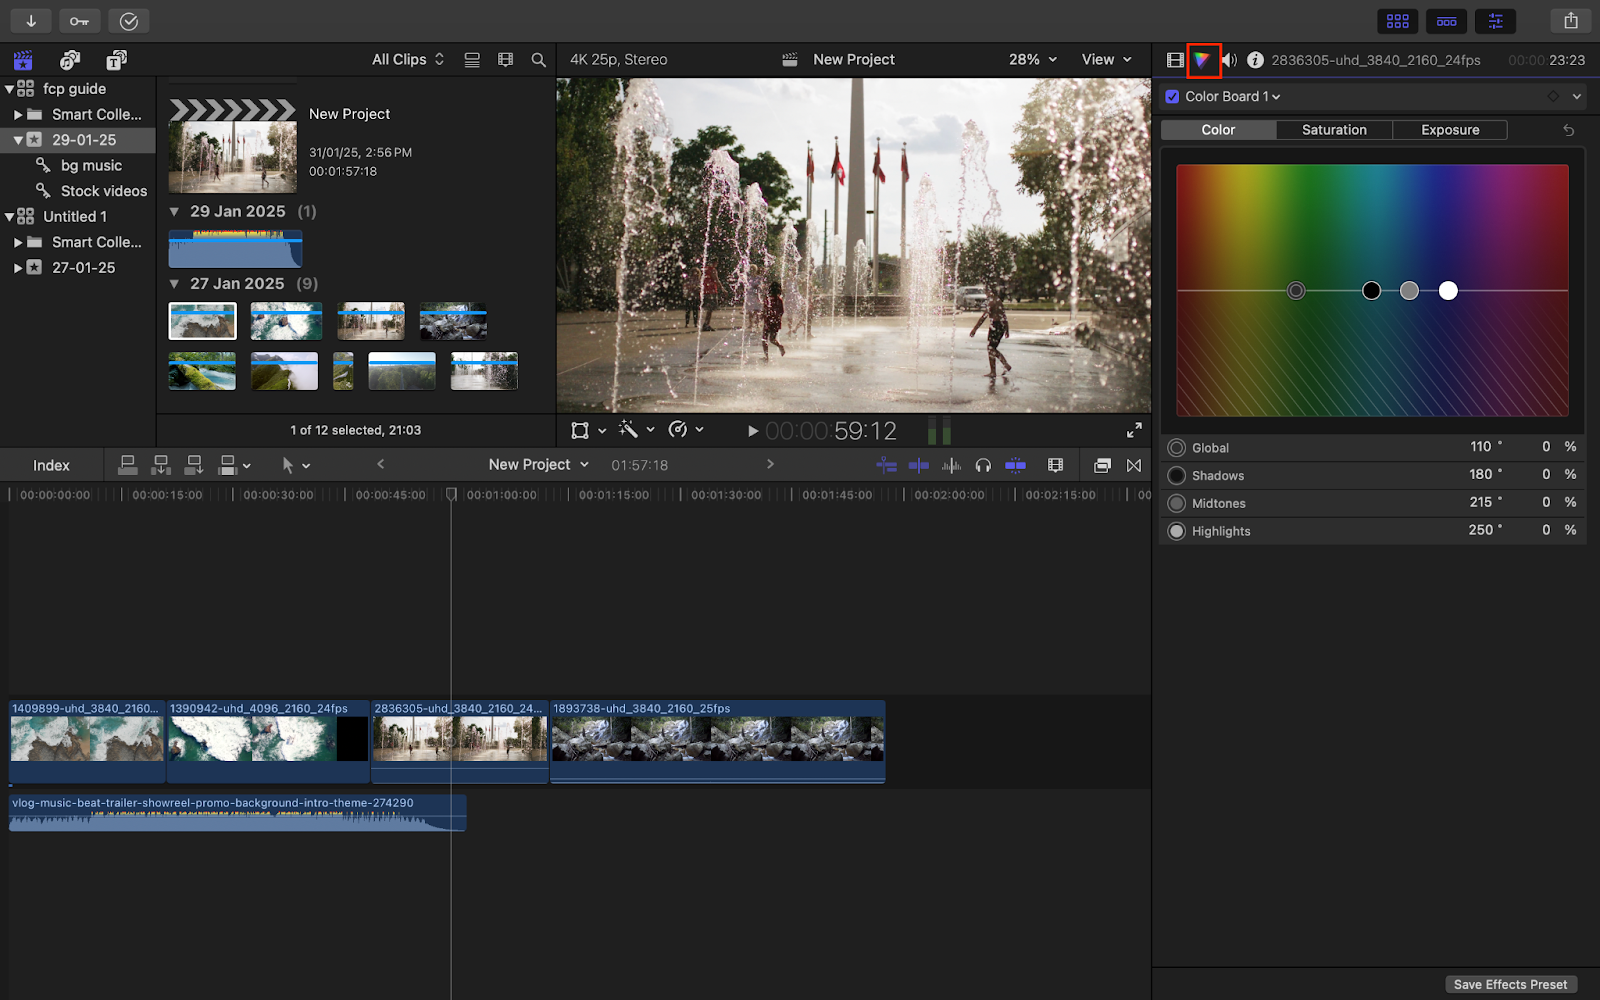
In the Color Inspector you have options to adjust color, saturation, and exposure. Each of them has four options: Global, Shadows, Midtones, and Highlights.
The far left corner in the color board has an option for global adjustment that allows users to adjust Shadows, Highlights, and Midtones at the same time. To make adjustments, drag the “Global” button across the board as per your need.
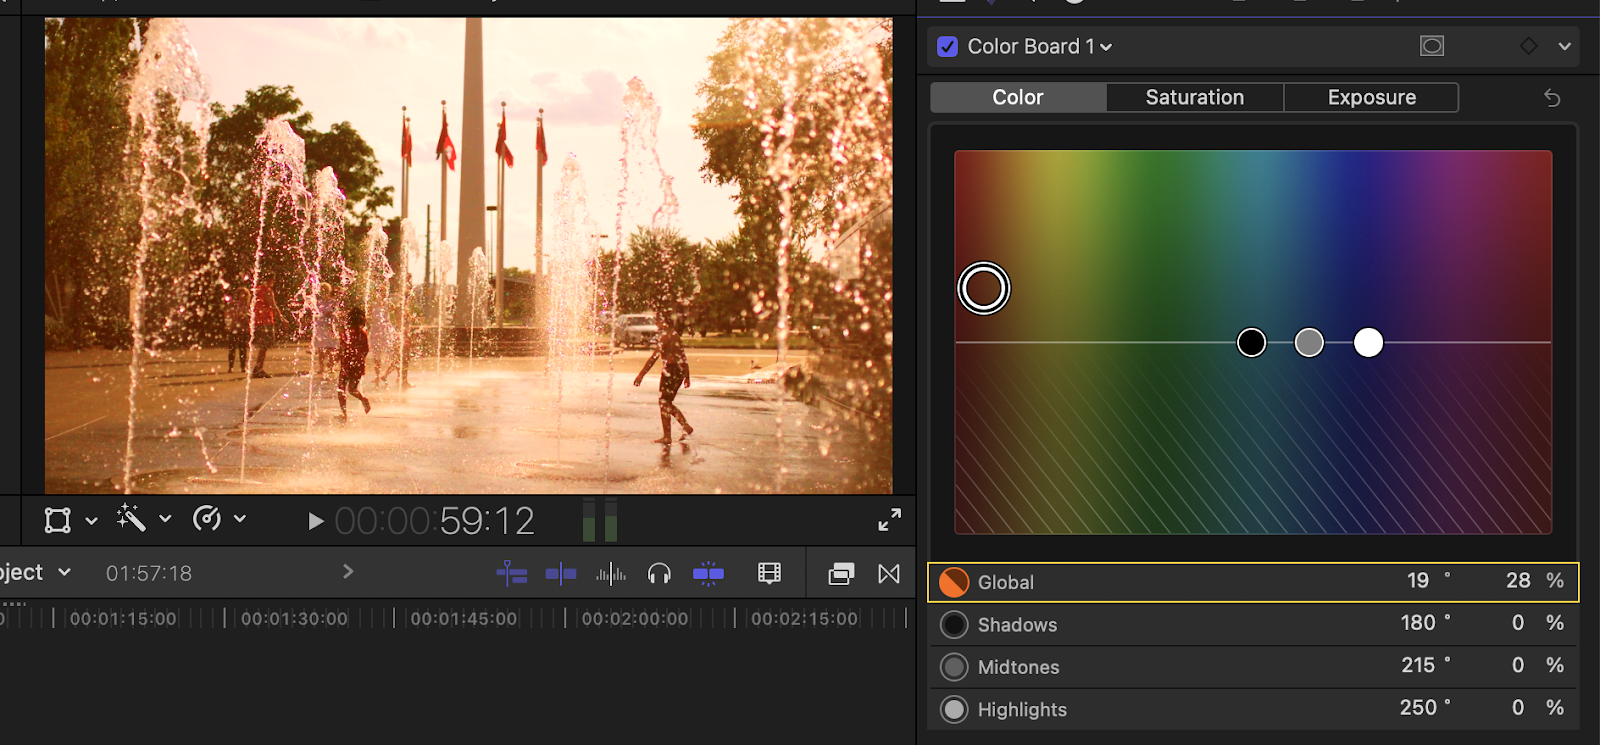
Anything above the middle line in the Color Board is the actual color you are getting whereas below this line you will get the opposite color to it.

You can also adjust Shadows, Midtone, and Highlights separately as per your requirement.
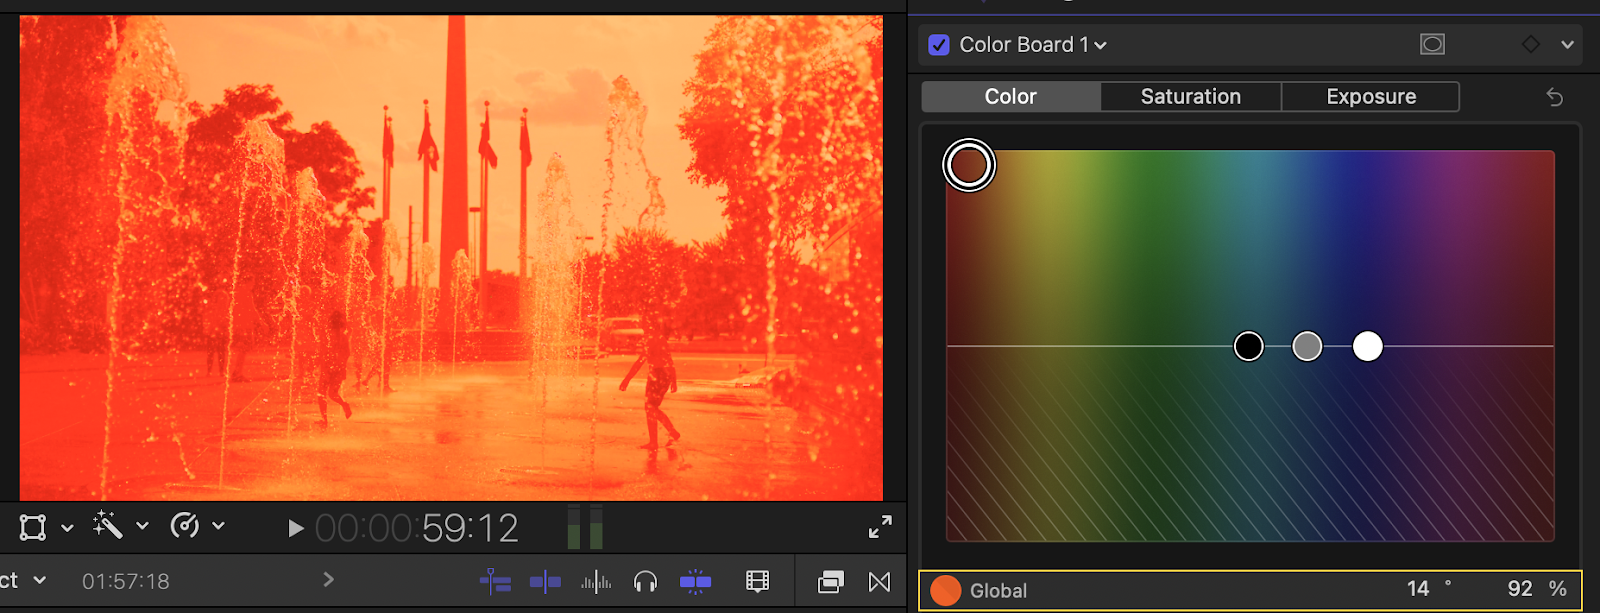
You can reset the adjustment to default by clicking on the “Arrow” present on the right corner.
 Image with color grading adjustment Image with color grading adjustment |
 Image after clicking on the arrow Image after clicking on the arrow |
Other Effects
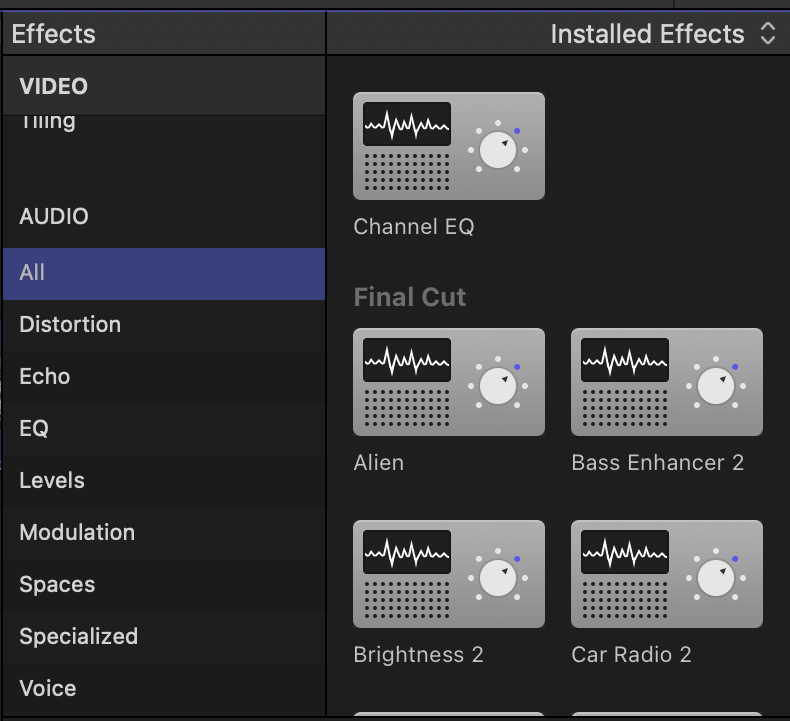
FCP comes with a number of built-in effects, such as blur effect, light etc. To use them, just drag and drop them to the clip which you want to apply these to.
There are many effects for audio also.
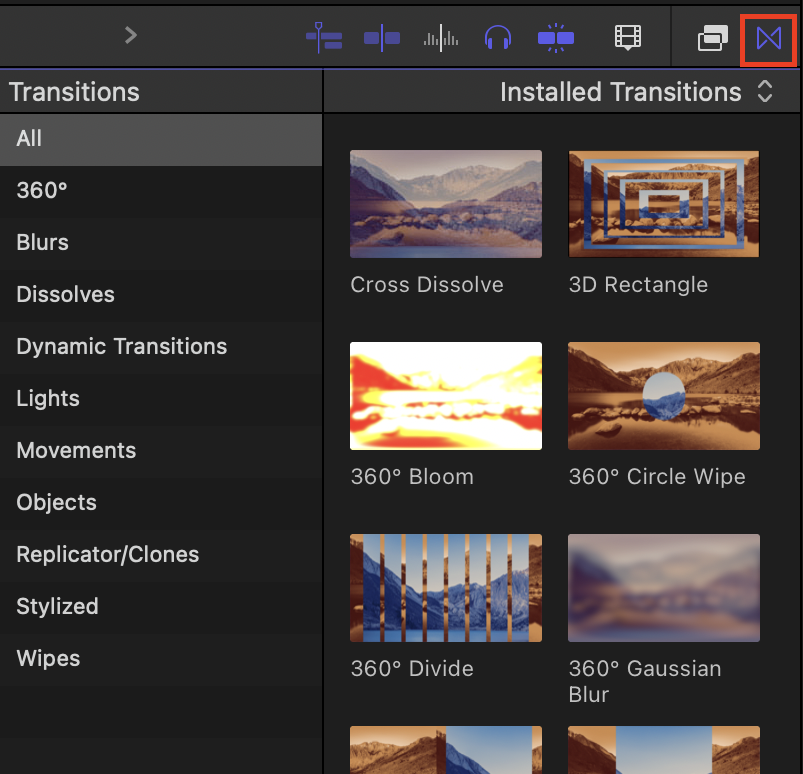
Transitions
In FCP there are multiple builtin transitions available to use, you can see them in the “Transitions Browser” situated next to the “Effects Browser.”
Audio Editing
You can add audio files to your timeline by dragging and dropping. After adding the audio on the timeline you can see a middle white line set to 0 dB, which is the default volume for all audio files in FCP.

You can increase or decrease the volume by lifting up (>0 dB) or lowering down (<0 dB) the white line.
 |  |
You can also adjust the volume by scrolling the volume slider in the right sidebar.

To change the volume at a particular part you can set the Keyframe between the points of that part of the clip and then lower or pump-up the volume.
“What are Key Frames?
Keyframes are points inside a clip where we set values for animations and effects.”
To do this, click on that part of the audio where you want to add your Keyframe, select the Keyframe option present on the right side of the volume slider. Select the part you wish to change the volume for and make your changes.
You can make as many Keyframes as you want as per your need.
You can also hold the “Option Key,” to make a new Keyframe- this will allow you to create new Keyframes just by clicking on your desired points on the audio timeline.
Alternatively, you can also use the range selection tool on the audio- it automatically makes required Keyframes within it.
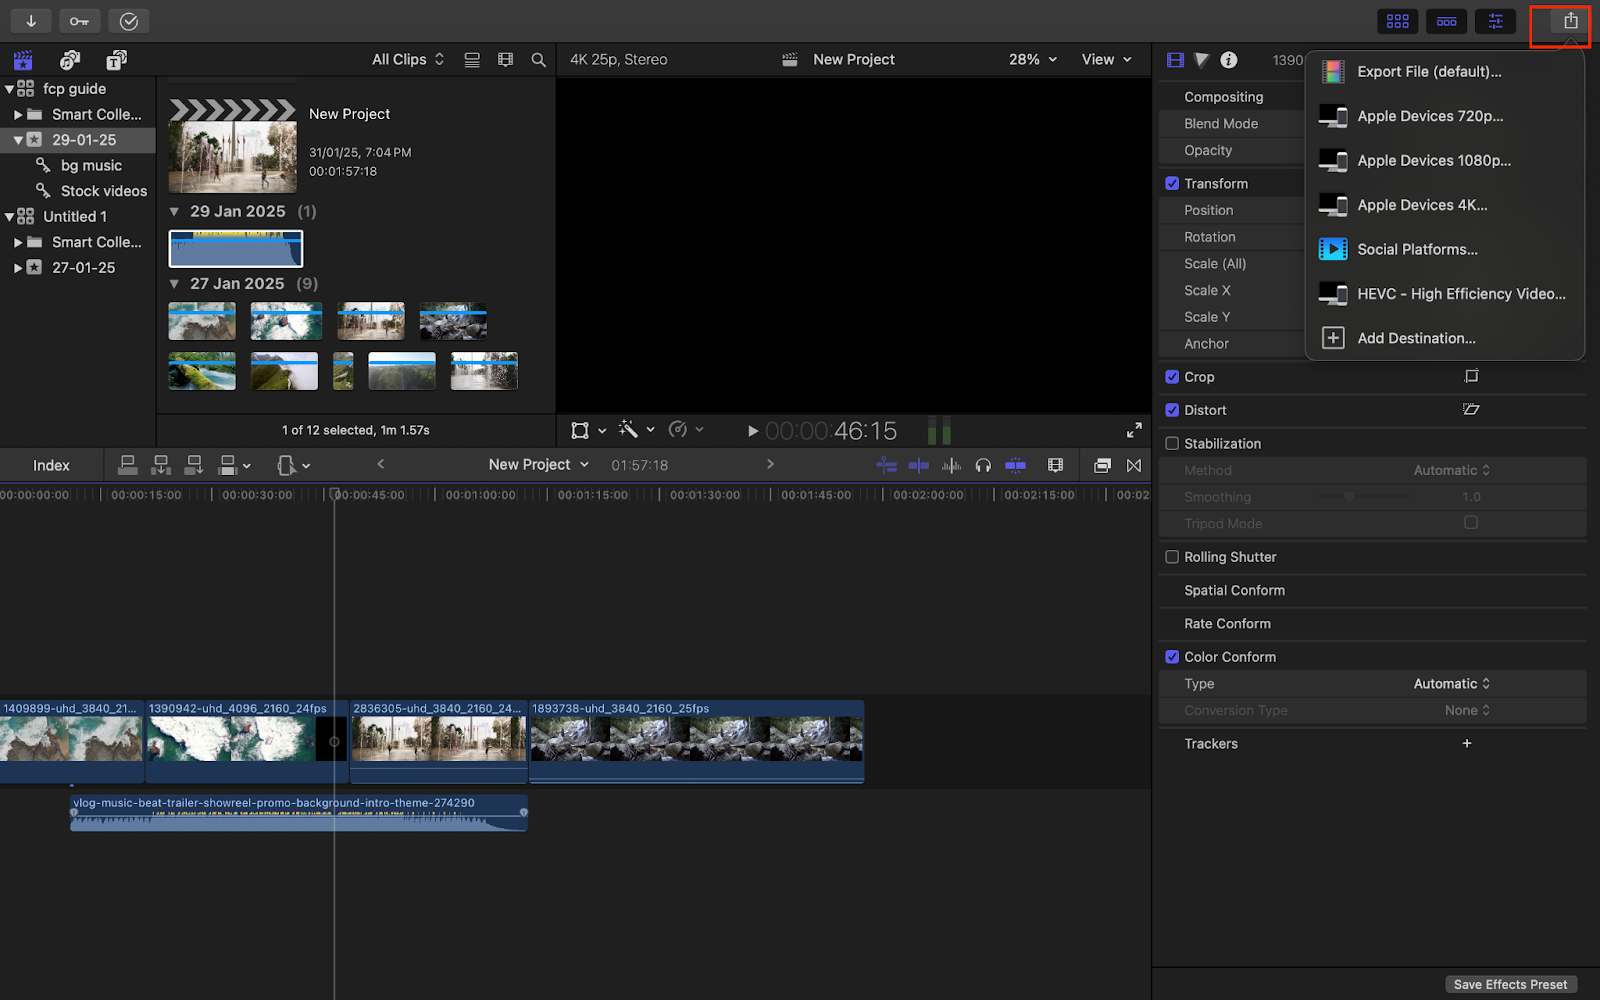
Export Project
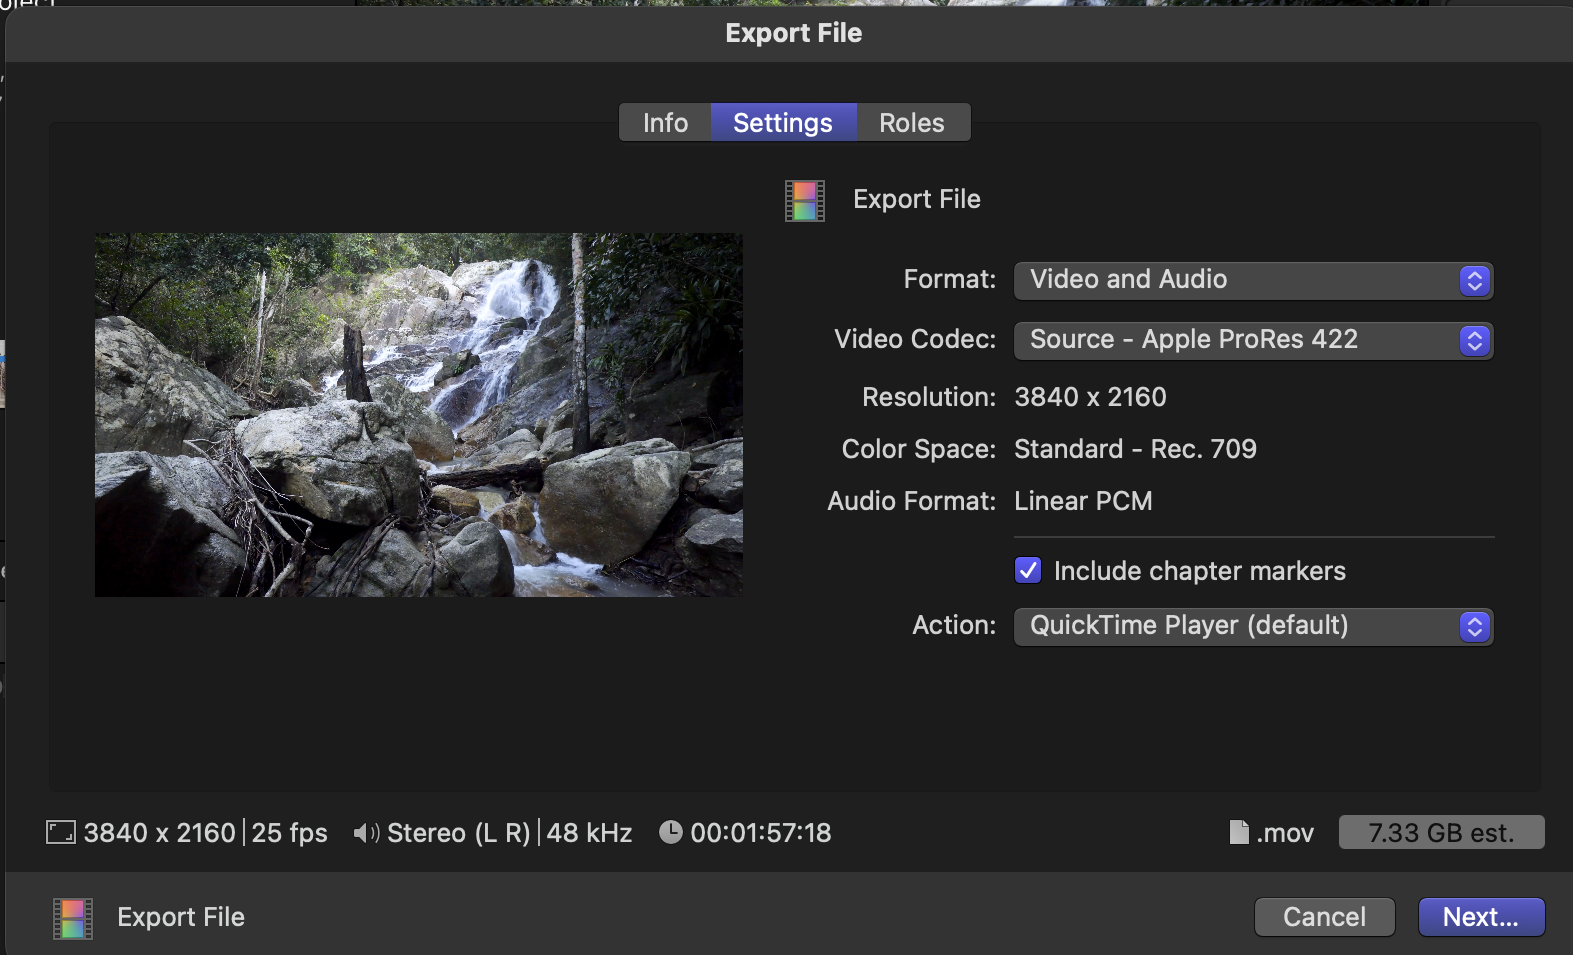
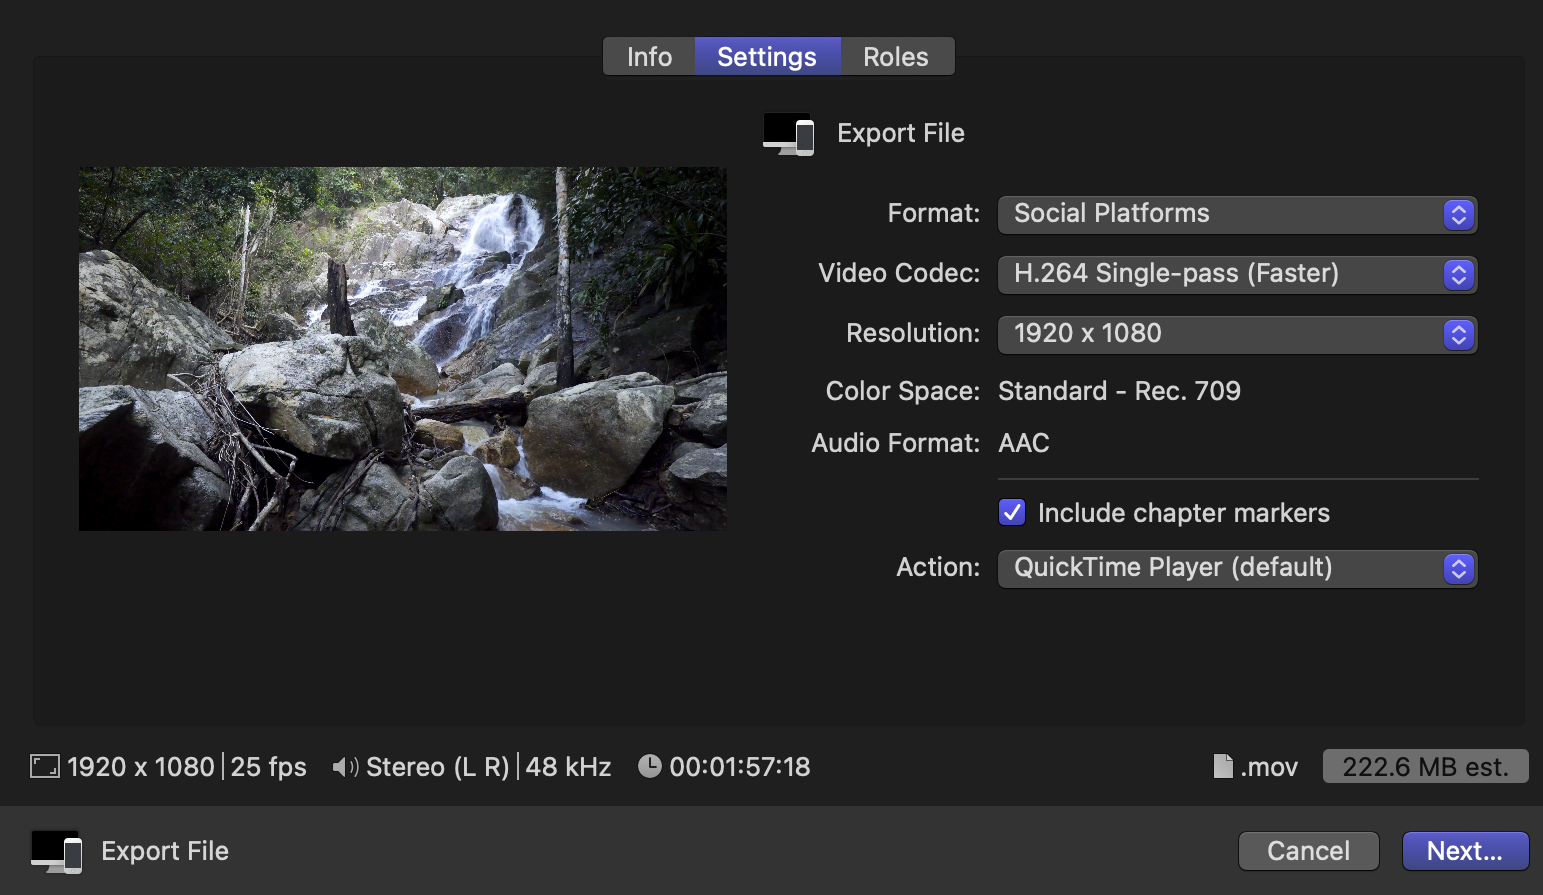
After completing the editing, now it’s time to export your project. To export the project, click on the “Arrow” button present at the top right corner. Click on “Export File.” Pick your preferred Video Format, Resolution, and other settings, click “Next” to export your file.
In this article, I discussed the app interface and various editing tools that can help you get started with Final Cut Pro. However, it is an expansive tool that requires a learning curve, and regular practice. So, get started today.
You can share your thoughts and questions in the comments section below.
You’re welcome. 🙂